Classic architectural rendering is tedious: assigning materials, setting up lights, waiting in the render queue — hours for a single image. Yet you already have a 3D model on hand. The method architects and interior designers have embraced in recent years is this: feed the model's viewport image (or a clay render) to AI and get a photorealistic render in minutes while preserving the geometry.
The class of models behind this — Nano Banana 2 and similar Gemini image models — understands architectural geometry surprisingly well; some of the industry's leading AI rendering tools run on the very same family under the hood. Oxava AI connects you to this model directly: you upload your viewport as a reference, steer it with a prompt, and upscale the result up to 4K. In this guide we walk through the entire process step by step — from prep to prompt, from material definition to lighting.
The Logic: What Is the AI Doing?
In this method the AI doesn't invent a scene from scratch. It builds on the geometry you provide and "dresses" it with materials, textures, lighting, and atmosphere. In other words, your viewport image determines the composition, perspective, and proportions; your prompt determines how it looks. The secret to a good result is keeping both inputs clear: a clean base image plus a layered recipe.
What Do You Need?
- A 3D model — SketchUp, Blender, 3ds Max, Rhino, or any SketchUp-like program. Even a low level of detail (massing/clay) is enough.
- A clean viewport image — captured from the final camera angle, as PNG.
- An Oxava account — where you'll upload the model as a reference and write your prompt.
- (Optional) Material samples — a photo of a fabric, stone, or wood texture you want to try.
- (Optional) Inspiration/atmosphere image — a reference photo carrying the light and mood you want.
Step 1 — Prepare the Viewport Image Properly
This is the most often skipped step, yet the one that most determines the result. The cleaner the geometry the AI sees, the more accurate the render it produces.
In SketchUp:
- Choose View → Face Style → Monochrome. Flat, shadowless surfaces give the AI clean geometry.
- Hide guide lines, dimensions, labels, and axes (stray text leaks into the render).
- Set the camera to the final composition — the AI inherits the frame from you.
- Export as PNG at a width of at least 1920 pixels (File → Export → 2D Graphic). JPEG leaves compression artifacts, so use PNG.
In Blender:
- Render with a Solid / Clay (matcap) look; no complex materials needed.
- Keep the scene clean, keep the UI out of the frame, and save as PNG.
- For advanced use: you can also capture depth and normal passes (see the ControlNet section below).
In 3ds Max / Rhino: the same logic — a clay/viewport image, clean geometry, the right camera, a high-resolution PNG.
Golden rule: Whatever is in the image besides the building/space (text, guides, UI) may be taken as "real" by the AI and added to the render. Keep it simple.
Step 2 — Upload the References (Geometry + Material + Style)
In Oxava, the Nano Banana models accept up to 14 reference images in a single generation. This is very powerful for architectural rendering, because you can use different references for different jobs:
- Main reference — your viewport image: carries the geometry and perspective.
- Material samples: a photo of the texture you want to try (e.g., a specific travertine, a fabric, a parquet). Upload the sample to scale and in the correct orientation; the AI applies the texture to surfaces more consistently.
- Atmosphere/style reference: a photo carrying the light character and mood you want.
Thanks to the model's strong instruction-following, the style you describe is applied to the structure you provide — without distorting the geometry.
Step 3 — Write a Good Render Prompt
An architectural prompt isn't random words — it's a shot brief. Think through these five layers in order:
- Space/building description — type, scale, number of floors, massing ("two-story detached house", "open-plan living room").
- Materials & surfaces — be specific: "light oak parquet", "Calacatta marble countertop", "charred cedar cladding" + surface quality (matte/glossy, veined/plain).
- Light & atmosphere — state the time and direction first: "afternoon light from the west, long shadows on the east wall".
- Camera & frame — lens and viewpoint: "35mm, eye level", aspect ratio (16:9, 4:5).
- Style & reference — "architectural photography style", "photorealistic", a movement or a feeling.
Then, to keep it faithful to the geometry, add this to the recipe: "preserve the existing geometry and perspective; apply only materials, textures, and lighting."
Interior example:
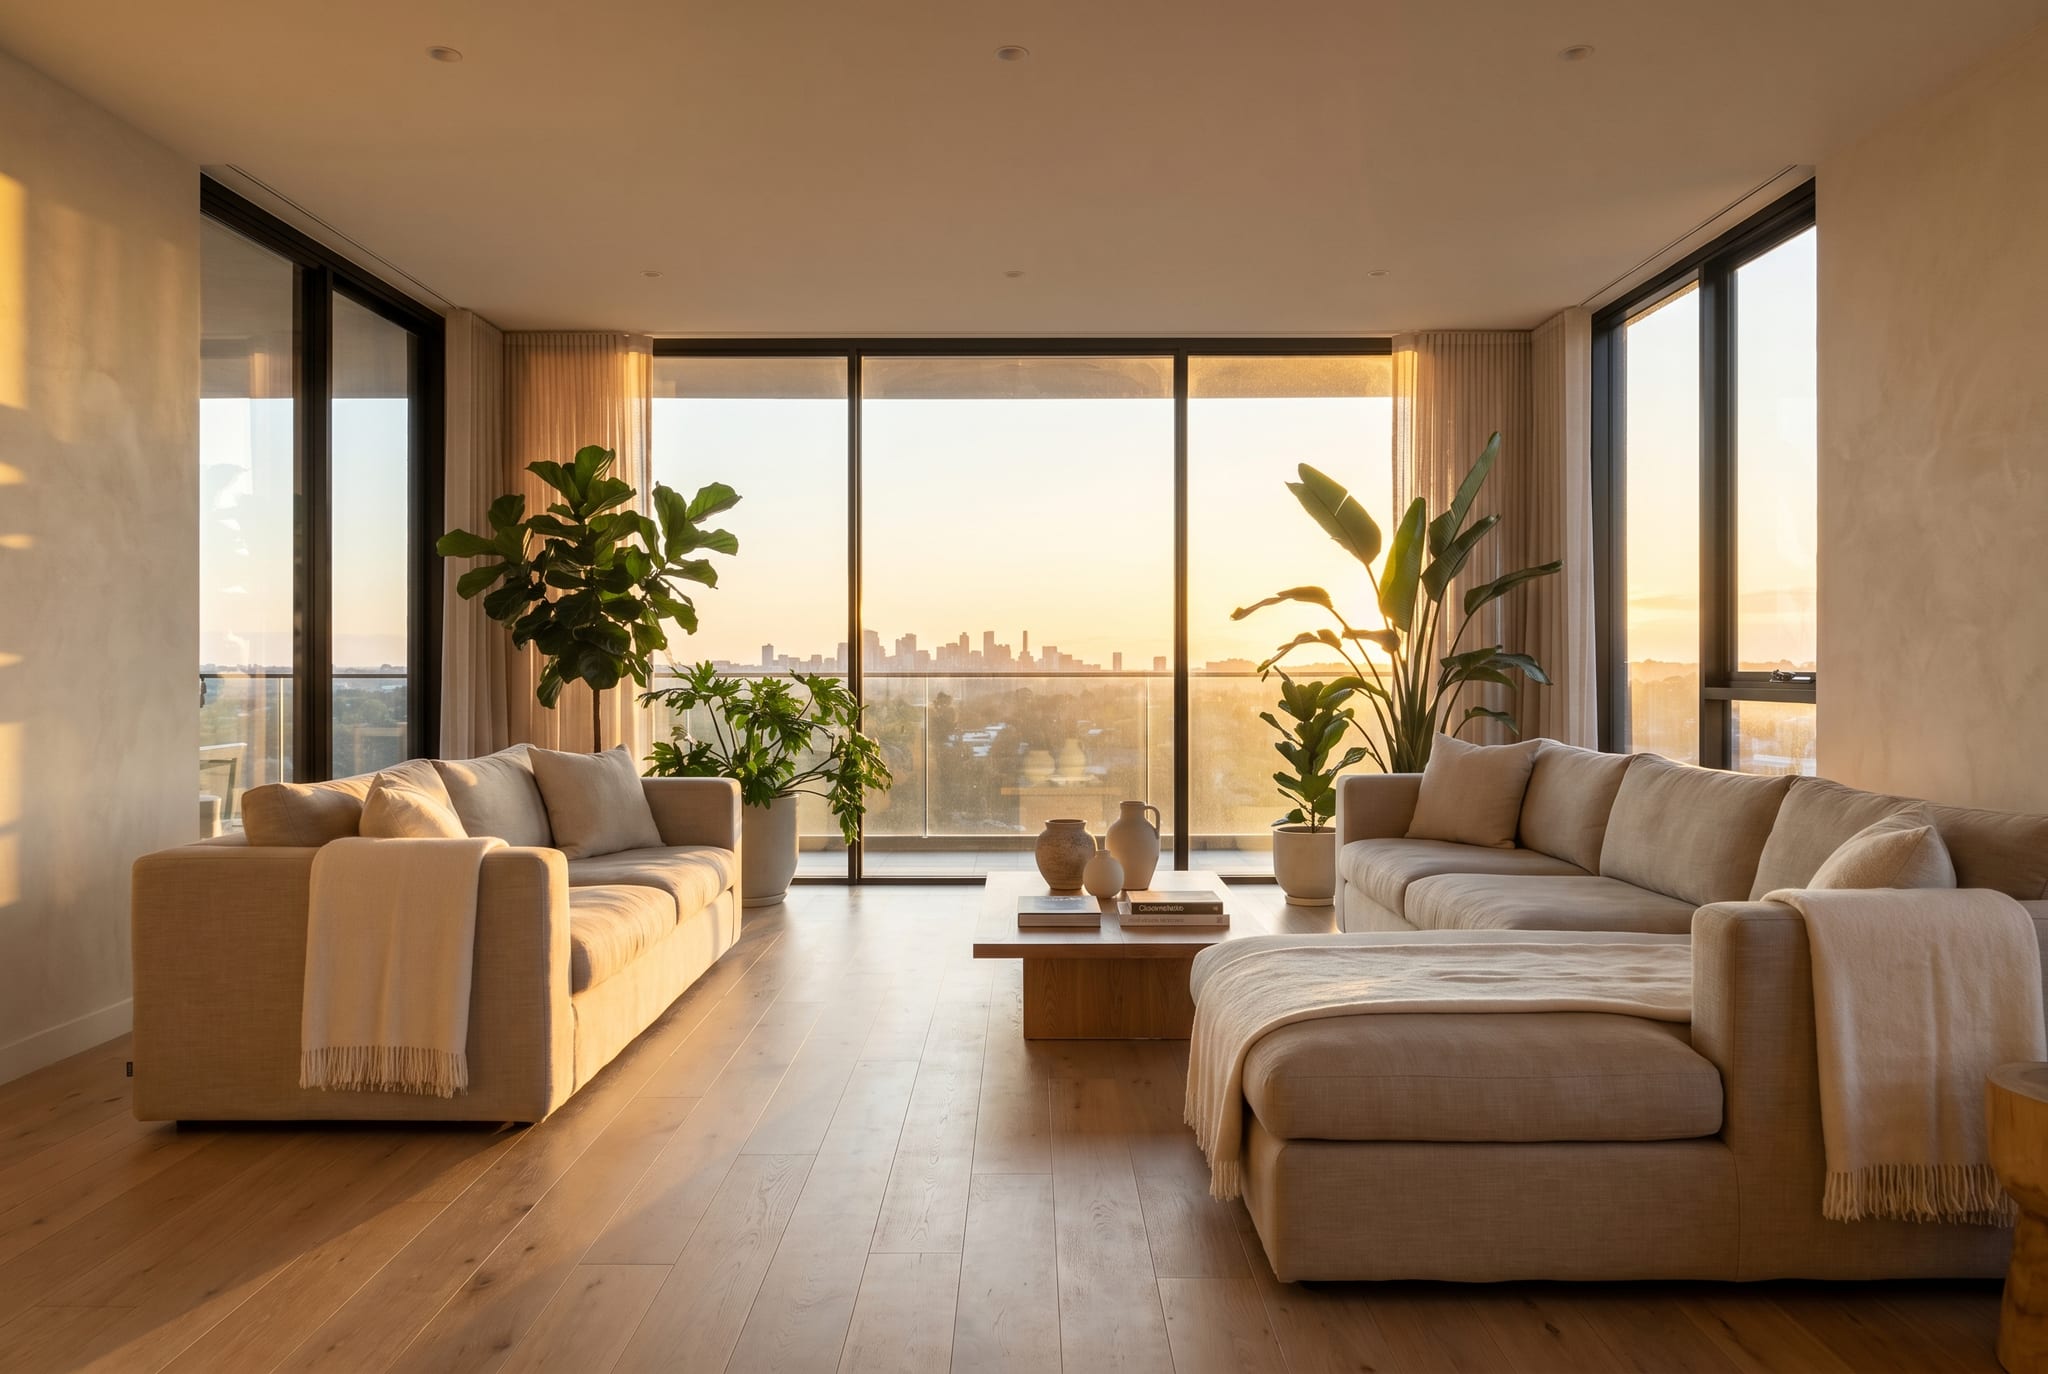
"Scandinavian-style open-plan living room, light oak parquet floor, matte white walls, floor-to-ceiling glass facade, linen-fabric beige sofa, walnut coffee table, brass pendant lighting; soft golden afternoon light from the west, long shadows on the east wall; 35mm lens, eye level, photorealistic interior photograph, 16:9. Preserve the existing geometry and perspective, apply only materials and lighting."
Exterior example:
"Two-story detached house, exposed white concrete and charred cedar wood cladding facade, floor-to-ceiling glass with black metal framing, flat roof; natural grasses and a concrete walkway in the garden; warm side light near sunset, long shadows at a 15° angle, faint morning mist in the background; 24mm wide angle, eye level, architectural photography style, 16:9. Preserve the massing and proportions from the model."
Notice that in both examples the subject, materials, light, camera, and style are each given one by one. Vague recipes like "modern living room render" produce flat and lifeless results.
How Faithful Should It Stay to the Geometry?
This is the lifeblood of the method: how much should the AI deviate from your model? Stay very faithful and the materials/lighting change while your design is preserved; go too loose and it inspires the massing study but the proportions can drift.
Professional tools have a dedicated "fidelity" slider for this. In Oxava, the practical control comes down to these three levers:
- A cleaner, more detailed base image — the clearer the geometry, the more faithful the result.
- Explicit prompt language — sentences like "preserve the existing geometry, apply only materials and lighting" reduce drift significantly.
- Model choice — if preserving geometry is critical, choose the model with high respect for the reference (Nano Banana 2 / Pro).
Defining and Swapping Materials
This is the part people are most curious about — because the real power lies here.
Defining (two ways):
- With the prompt: write the material by name. Instead of "white wall" → "matte white lime-plastered wall"; instead of "marble" → "polished gray-veined Carrara marble".
- With an image: upload a photo of the real texture you have as a material reference. It gives far more consistent results than text alone — especially for a brand-specific stone, fabric, or parquet.
Swapping (A/B testing):
Keep the same viewport fixed and change one single thing in the prompt, then compare:
Facade test: "...brick facade..." → "...vertical wood paneling facade..." → "...exposed concrete facade..."
Within seconds you see the brick, wood, and concrete variants side by side and make a material decision without redrawing the model. You can run the same test by swapping a fabric/stone sample image as well.
Tip: When you want to change a single element (e.g., just one window frame), the general method is region-select editing called "inpainting". In Oxava, the most practical route instead is to regenerate with a more targeted prompt + a clean base, or to crop that region and take a separate variation.
Control the Lighting
Lighting is what separates a render that looks like "computer output" from one that looks like a "photograph". The most common mistake: not specifying the light. State the time of day and the direction of the light first:
- Interior: "afternoon light from west-facing windows, warm tone, soft shadows on the east wall."
- Exterior: "side light near sunset, long shadows" → drama; "lightly overcast, diffuse light" → soft and neutral presentation.
Interior or Exterior? The Differences
Interiors are viewed up close; that's why material textures, furniture style, and light quality come to the fore. Clearly define whether surfaces are matte/glossy, the style of the furniture, and the direction of the window light.
Exteriors are framed more widely; the surroundings, landscaping, and materials read from a distance (brick, cladding, roof type) along with the drama of the light are what matter. Add context to the foreground such as natural grasses, trees, and a walkway.
Step-by-Step Workflow (Summary)
- Prepare: a clean viewport/clay image (PNG, high resolution, the right camera).
- Upload: viewport + (if any) material samples + style reference.
- Explore: scan different directions with 3-5 low-cost attempts (saves credits + fast feedback).
- Select & refine: pick the closest result, update the prompt based on what worked.
- Upscale: take the frame you like up to 4K and bring it to print/presentation quality (Oxava's Upscale feature).
Common Mistakes
- Negative descriptions: instead of "no cars, no people", describe what you want. Gemini-class models respond to positive descriptions.
- Conflicting styles: contradictions like "minimal but ornate baroque" scatter the model.
- A dirty base image: guides, dimensions, and UI text leak into the render — keep it simple.
- Vague lighting: if you don't give the time/direction, you get a flat, lifeless result.
- Expecting exact consistency across multiple angles: the AI produces small variations at each angle; for projects requiring a uniform material library across all views, classic rendering is still superior.
- Skipping structural logic: the AI doesn't know physics; check the cantilever, the overhang, and the proportions yourself before presenting.
- Zooming in too close: detail resolution drops up close; these renders give the best results at eye-level distance.
Advanced: The ControlNet Route
For those who want pixel-level control and have a powerful GPU, Stable Diffusion + ControlNet is an alternative route. You capture depth, canny, MLSD (ideal for straight lines), or segmentation passes from Blender and feed them to ControlNet as input, keeping the geometry very tightly preserved; negative prompts also help here. In return, the setup and hardware burden are high. If you're looking for the fast, setup-free path that runs in the browser, the reference + prompt approach is more than enough for most jobs.
Next Step
Open a model, capture its viewport as a clean PNG, and upload it as a reference in Oxava; write your five-layer recipe and produce your first render. To go deeper into prompt writing, take a look at our How to Write an AI Image Prompt? guide, then head straight to the studio and bring your first scene to photorealistic life.
Oxava Team
From the Oxava content team. Writing about the creative side of generating images and video with AI.
Related Articles
ALL POSTS
Subscribe to our newsletter
Be the first to hear about new techniques, model updates and ideas on AI generation.