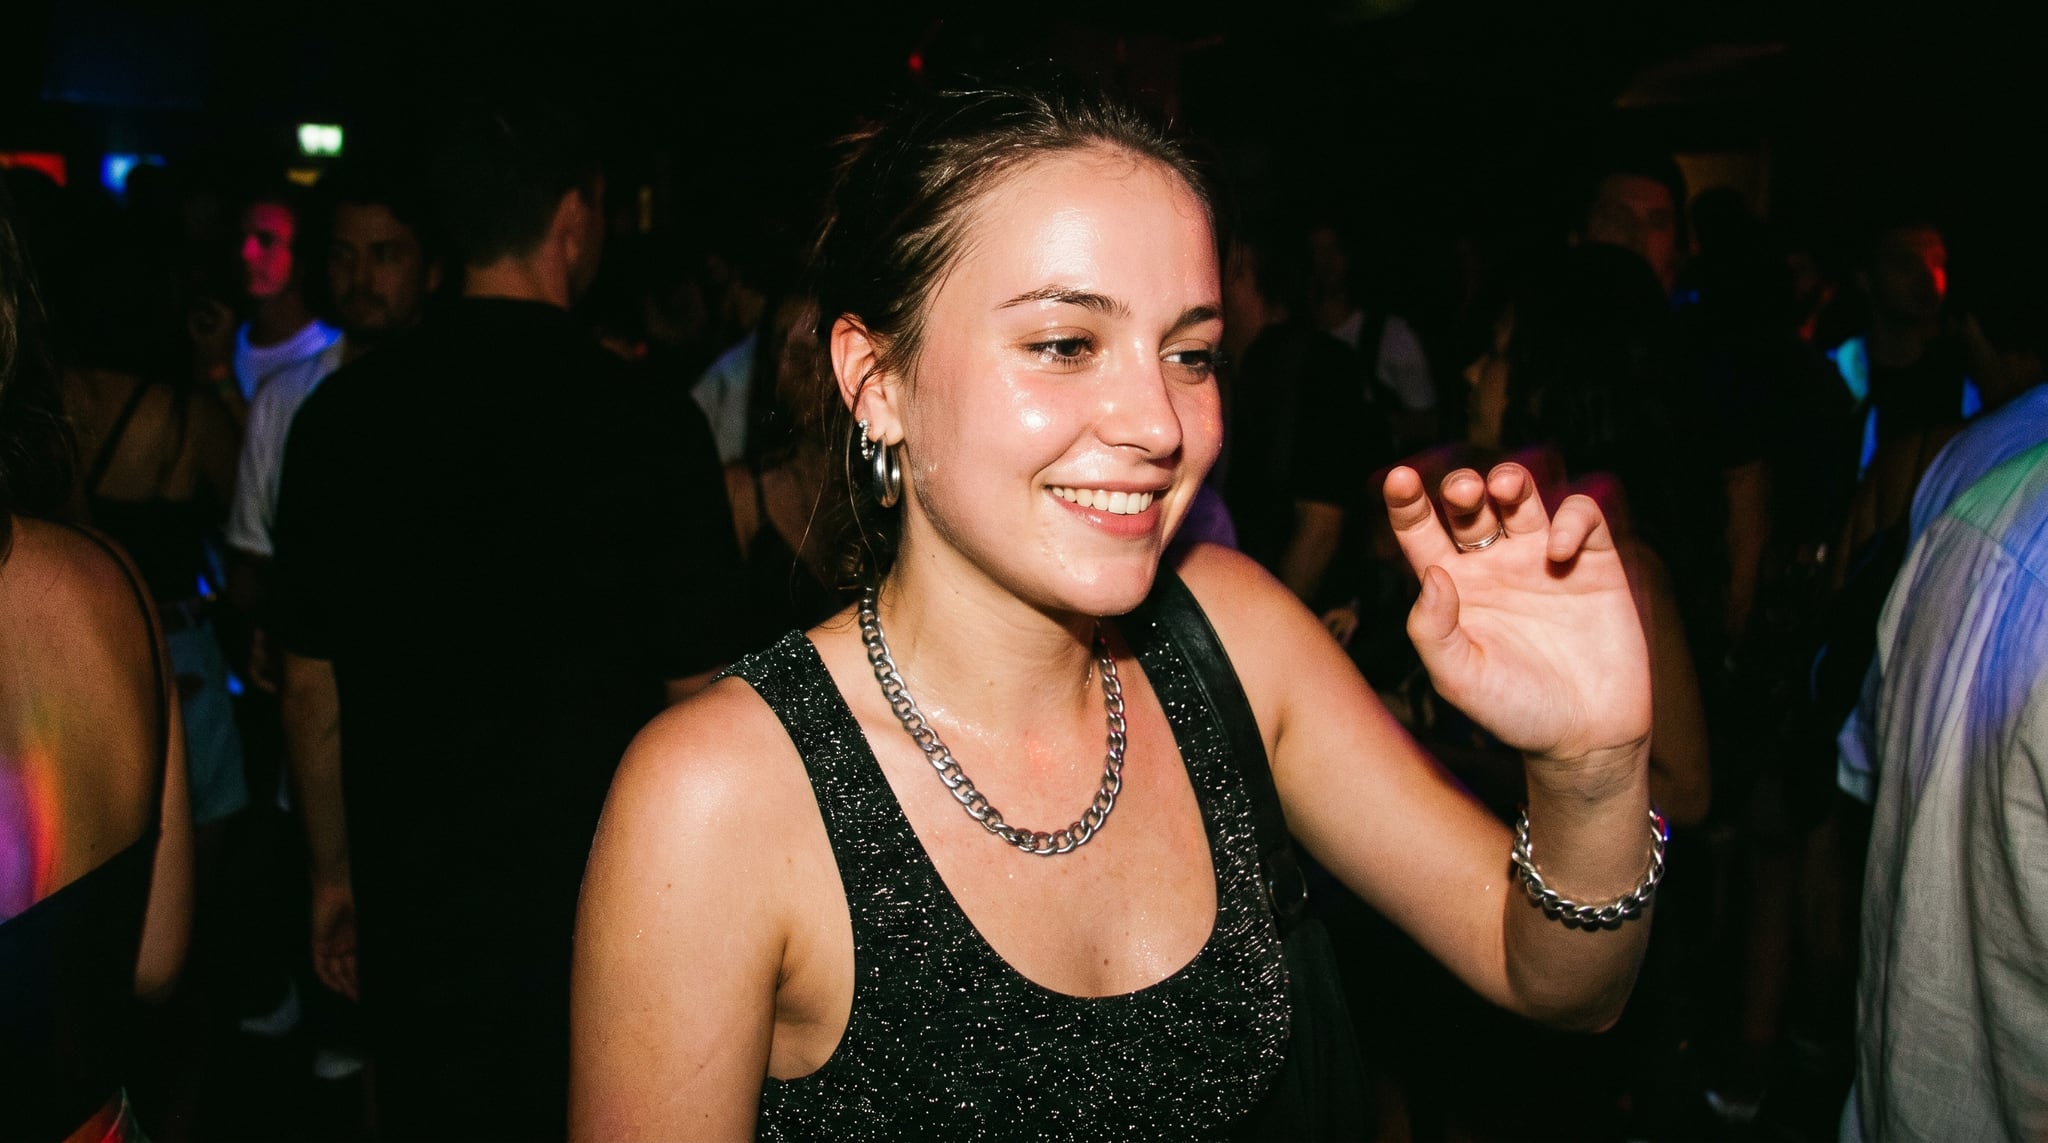
Right now your feed is full of harsh-flash, dark-background party shots that look like they were pulled off a 2007 point-and-shoot. That's the viral Instagram AI flash filter, and it has been near the top of the trend charts since April 2026. The catch: Instagram's built-in version caps you at roughly one generation a day, and creators keep complaining that it warps faces, changes eye color, and shifts skin tone. This guide gives you a copy-paste Instagram flash filter AI prompt and a step-by-step way to recreate the look in Oxava using image-to-image, so you can run it as many times as you want and actually keep your own face.
What is the viral "AI flash filter" (and why everyone's posting it)
The look exploded when Instagram added a "Create with AI" option inside Stories in April 2026, and as of June it's still going strong. It mimics the late-2000s digicam aesthetic: a direct on-camera flash, a near-black room, and that slightly trashy, candid party energy everyone associates with old Facebook albums. TikTok piled on with before/after clips, and the nostalgia did the rest.
It's popular for a simple reason: it makes any normal photo feel like a moment instead of a pose. But the native filter is limited and inconsistent, which is exactly why so many people are looking for a way to recreate the Instagram flash filter on their own terms.
The 4 ingredients of the look
Strip the trend down and it's really just four things stacked together. Nail these and you've got it:
- Harsh frontal flash with blown highlights. A hard, direct light source straight on the subject, hot spots on the forehead, nose, and cheekbones, slightly overexposed.
- Near-black, dark background. The flash falls off fast, so everything behind the subject drops into deep shadow. This is what makes the subject pop.
- Dewy, glossy skin. Light bouncing off slightly shiny skin reads as "caught in the moment," not studio-smooth.
- Y2K digicam grain and soft noise. A touch of sensor noise, mild compression, and a faint color cast sell the early-digital-camera vibe.
If you want to understand why naming these specifics out loud matters so much, our guide on how to write image prompts breaks down why concrete, sensory descriptors beat vague ones every time. The flash filter is a perfect case study: "make it look retro" gets you nothing, but "harsh frontal flash, blown highlights, near-black background" gets you the trend.
Copy-paste Instagram flash filter AI prompt recipe
Here's the base recipe. Use it with image-to-image (i2i) so the AI works from your actual photo instead of inventing a new person. The single most important line is the face-preservation instruction.
Base prompt:
Direct on-camera flash photography, harsh frontal flash, blown-out highlights on the face, near-black dark background, dewy glossy skin, candid party snapshot, late-2000s digital camera aesthetic, subtle sensor grain and noise, slight overexposure. Keep the exact face, features, skin tone, and eye color from the uploaded photo unchanged.
Variant 1 — party / night:
Direct flash party photo at night, harsh frontal flash, deep black background, glossy skin with light hot spots, motion-blur edges, Y2K digicam grain, warm slightly overexposed look, candid energy. Keep the exact face and identity from the uploaded photo.
Variant 2 — editorial / teal shadow:
Editorial flash portrait, hard direct flash, blown highlights, dark background with a cool teal shadow tint, dewy skin, fine digital grain, crisp magazine-snapshot feel. Preserve the exact face, features, and skin tone from the uploaded photo.
The reason the look breaks for so many people is that they generate from text alone, which gives the AI freedom to redraw the face. Anchoring to your photo with i2i and an explicit "keep the exact face" line is what keeps it you.
Do it in Oxava: step-by-step
You can run this whole thing in the Oxava studio in under a minute:
- Upload your photo as the image-to-image reference.
- Pick your model. Choose an image model in the studio that handles realistic portraits well, then paste one of the recipes above.
- Paste the recipe into the prompt box and keep the face-preservation line intact.
- Tune reference fidelity / strength. This is the lever that decides how much of your original photo survives. Push fidelity higher to lock the face; if the flash effect isn't strong enough, ease it down slightly until you hit the sweet spot.
- Generate — and run it again with the variants. No daily cap, no waiting until tomorrow.
The advantage over Instagram's native filter is twofold. First, there's no one-a-day limit, so you can iterate until it's right instead of burning your single shot on a bad result. Second, because you control reference fidelity, you avoid the face-warping and eye-color drift people keep flagging on the built-in version. If you want to go deeper on how strength, masking, and references work together, our image-to-image editing workflow guide covers the full toolkit.
When you've got a keeper, that's your post.
Quick fixes
A few things that go wrong, and how to fix them fast.
My face keeps changing. Raise the reference fidelity / strength toward your original photo and make sure the "keep the exact face" line is in your prompt. If it's still drifting, start from a sharper, well-lit source photo so the model has more identity to lock onto.
What's the best kind of photo to start with? A single subject, clear face, and a plain or uncluttered background work best. Busy group shots confuse the flash falloff and make the dark-background effect harder to land.
It came out way too grainy. Dial back the grain wording — drop "heavy grain" for "subtle sensor grain," or remove the noise descriptor entirely. A little goes a long way for the digicam feel.
Which model should I use? Any of the realistic-portrait image models in the Oxava studio will work. Try one, and if the skin or face feels off, switch models and re-run the same recipe — different models render the flash and skin texture differently.
The trend won't last forever, but the skill behind it will. Once you can describe a look this precisely and lock your own face into it, you can recreate almost any aesthetic that goes viral next. Try the recipe in Oxava — upload your photo, paste a prompt, and get the flash look without the daily limit or the warped face.
Oxava Team
From the Oxava content team. Writing about the creative side of generating images and video with AI.
Related Articles
ALL POSTS

Subscribe to our newsletter
Be the first to hear about new techniques, model updates and ideas on AI generation.