
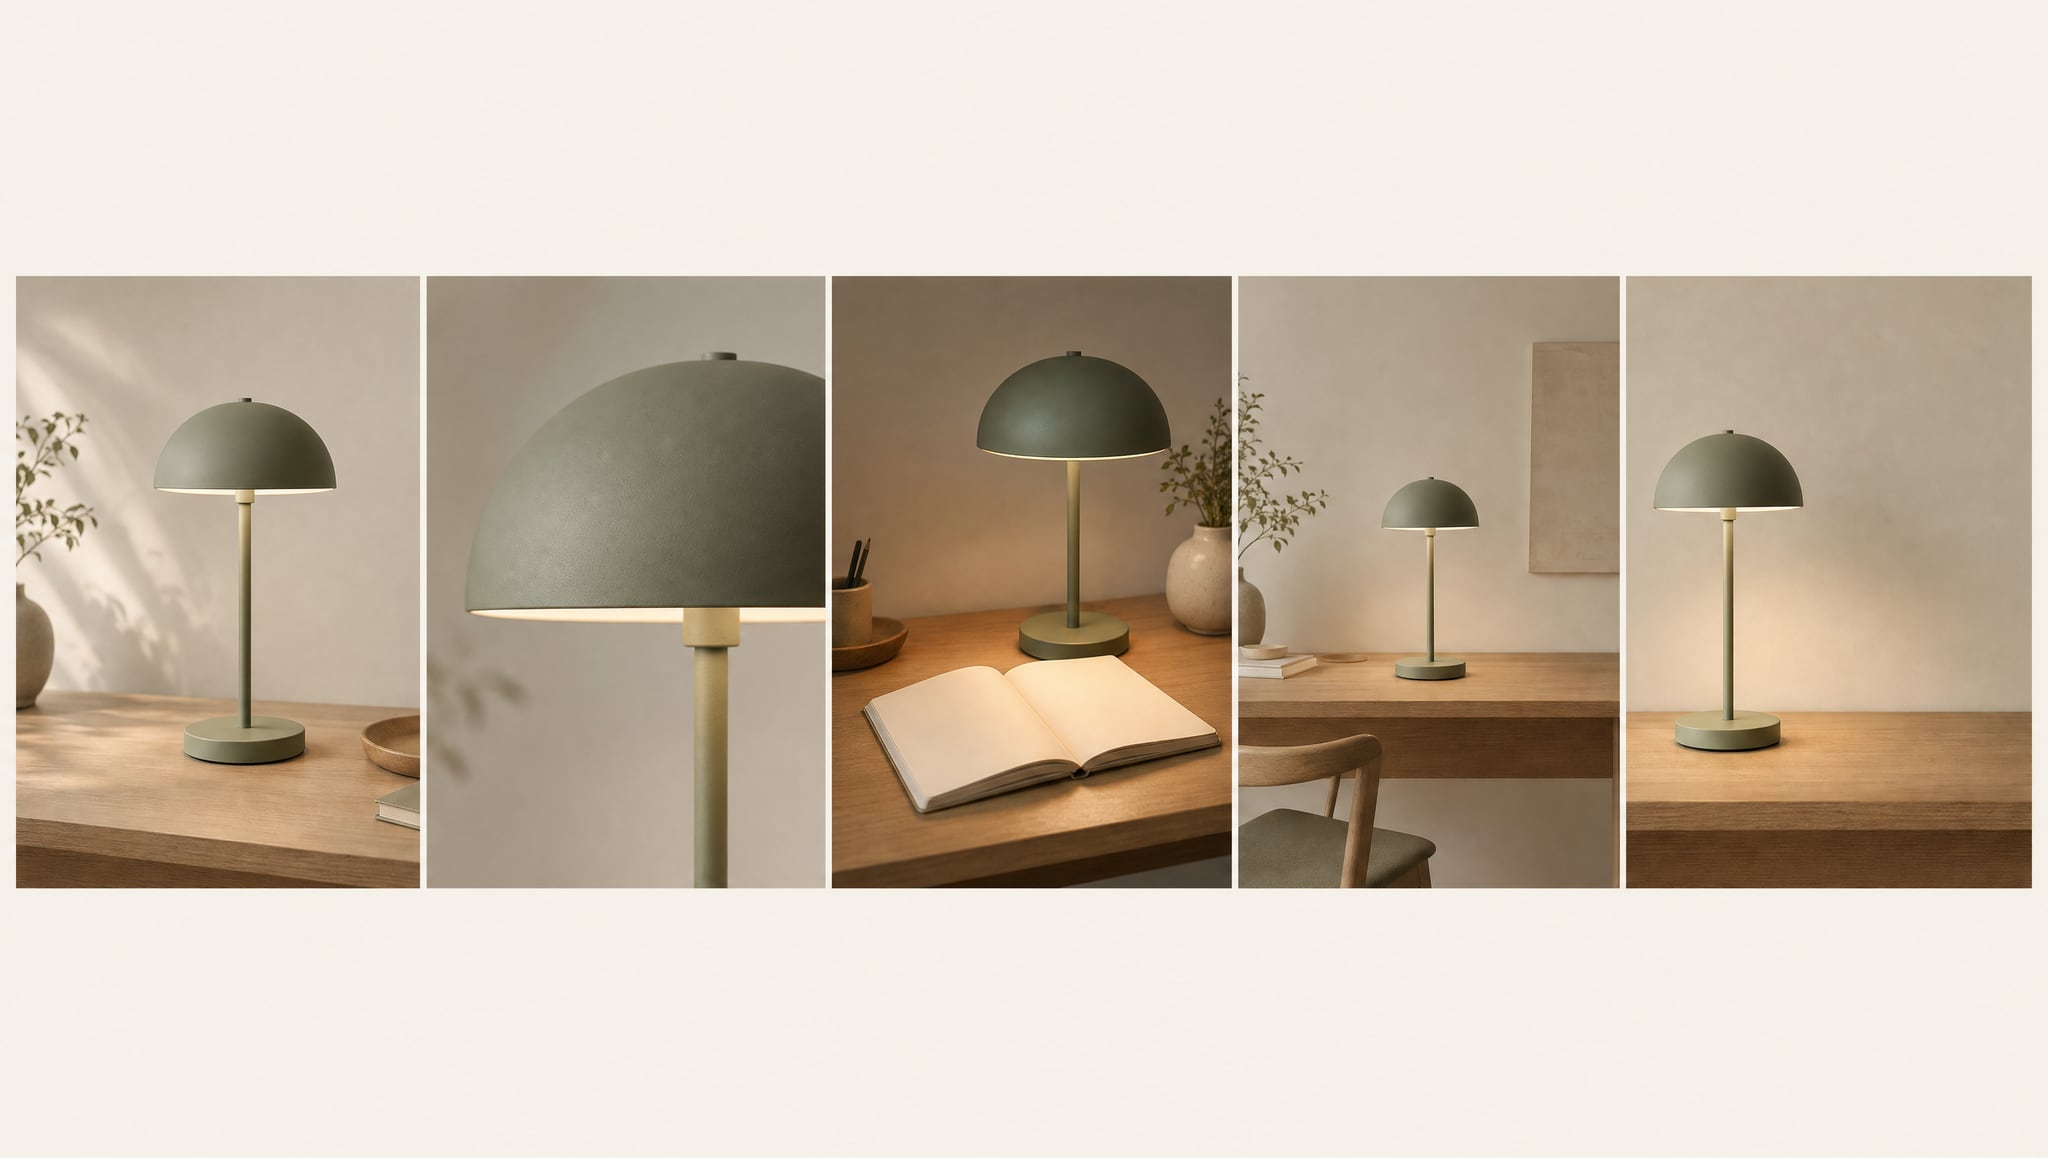
Learning how to storyboard an AI product video starts with a question no motion prompt can answer: what should the viewer understand after 15 seconds? You can generate five attractive clips and still end up with an ad that says nothing. A storyboard gives each clip a job, reserves time for the message, and tells you what footage the edit actually needs.
This guide builds a complete example around a fictional, unbranded, matte sage-green desk lamp. Its round base, slim stem, and dome shade remain the same in every shot. The story is deliberately modest: the lamp creates a calm pool of light on a desk. We will make no claims about brightness, battery life, or performance. By the end, you will have a five-shot board, reference-image briefs, motion prompts, a quality checklist, and an edit plan you can adapt to your own product.
Start with the promise, then write the last frame
A short product ad needs one clear idea. Here the idea is a quiet place to focus. It is a mood and a visible scene, not a technical claim. Write that sentence at the top of your planning document before opening an image or video generator. It becomes your test for every shot: does this image help a viewer see the lamp's shape or feel the desk atmosphere?
Now decide where the ad ends. Our final frame shows the lamp on the same desk, with empty space beside it for a headline and call to action. This is a composition decision, not an instruction to the image model to spell a brand name. Add actual text later in an editor, where you control wording, timing, and legibility. If the last shot is already crowded with props, you cannot easily rescue the call to action in post.
Adobe's shot-list guide recommends recording details such as shot number, framing, camera angle, movement, scene action, and audio notes so an editor has the coverage to assemble a coherent sequence. That production discipline remains useful with generated media. Your “location” may be a reference image rather than a physical set, but the editor still needs a wide view, a detail, a moment of use, and a clean ending.
How to storyboard an AI product video in five shots
The times below describe the final edit, not how long each source clip must be generated. If your available model creates five-second clips, you can make five clips and select 3, 2, 4, 3, and 3 seconds from them. You can also hold a suitable still end frame for the final three seconds. Generate enough footage for handles around each cut, then trim to the planned duration.
| Final edit | Shot's job | Reference frame | Motion brief | Accept when... |
|---|---|---|---|---|
| 0–3 s | Introduce the product | Medium view of the complete sage-green lamp on a quiet desk | Slight push-in | Base, stem, and shade stay recognizable; the first frame reads instantly |
| 3–5 s | Show its form | Close view of the dome shade meeting the slim stem | Very gentle lateral move | The connection and color remain consistent with shot 1 |
| 5–9 s | Show the idea in use | Lamp beside an open, blank notebook, with a visible pool of light | Locked camera | Light falls calmly on the desk; no invented controls or extra lamps appear |
| 9–12 s | Give the scene context | Wider view of the same desk and notebook | Slight pull-back | The desk layout matches the earlier shot and the lamp is still the hero |
| 12–15 s | Leave room for the message | Stable product view with deliberate empty space to one side | Static hold | The empty area remains usable for text and the product is unobstructed |
The math matters: 3 + 2 + 4 + 3 + 3 = 15 seconds. The cut points are a planning baseline. A two-second detail can be selected from the clean middle of a longer lateral move. The four-second light shot gets more time because the viewer needs to notice the atmosphere. The final three seconds let the message sit long enough to read.
You can sketch this board on paper or in a slide. Put one frame, one time range, one movement, and one acceptance criterion in each panel. Keep audio in a separate row: for example, soft instrumental music across the sequence, a gentle edit beat at 3 and 9 seconds, and no implied sound from the lamp. A storyboard is an instruction for making and selecting footage; a grid of five panels is not a video input. Export or create each shot's reference image separately.
Make reference frames that can survive the cut
Consistency is more important than photographic novelty here. Start with a genuine product photo if you have one. If you are concepting a fictional object, create a clean master image and define what cannot change: exactly one lamp, matte sage-green finish, round base, slim straight stem, dome shade, no writing or logo, and one warm pool of light. Only specify details that you can verify from the source. For a real product, do not ask an image generator to imagine the unseen back or underside.
Then produce five separate frames, each composed for its shot. Reuse the master image or real product photograph as a visual reference when generating the other angles. Adobe's commercial storyboard tutorial illustrates a useful progression from a consistent visual source to individual panels and then a motion preview. The transferable idea is visual continuity across panels; the tutorial's interface steps belong to its own tool, so your workflow can live in a document, Oxava, and an editor.
Here is a starting image brief for the first frame. Treat it as a draft to inspect, not a promise of a particular result:
Reference image prompt, shot 1: A single unbranded desk lamp on a tidy wooden work surface. Matte sage-green dome shade, slim straight stem, round base; the entire lamp is visible in a medium product composition. An open blank notebook sits farther back on the desk. The lamp casts a soft, calm pool of warm light across the tabletop. Muted neutral background, realistic material texture, restrained editorial product photography, clear silhouette, no visible writing.
For shot 2, change the framing, not the product: ask for a closer view of the same shade and stem junction, from a compatible side of the desk. For shot 3, show the same lamp beside the blank notebook with the light area legible. For shot 4, pull the composition wider while keeping the desk layout. For shot 5, reserve uncluttered space on the right or left for later text. In Oxava's studio, you could use Nano Banana 2 with the approved lamp image as a reference while making each frame, then save the five approved images separately. Inspect every result; a reference image does not guarantee an identical object.
Prepare the final delivery format before generating frames. A vertical social ad needs safe room for platform overlays and on-screen text; a landscape placement needs different negative space. Compose the source frames in the target orientation when using an image-to-video model whose output follows the input frame. Cropping a wide lamp close-up into vertical later may remove the base or the text area. Our guide to vertical AI video for Reels and TikTok goes deeper into framing decisions for those placements.
Give every frame a quick product audit: one lamp, the same color, the same base-stem-shade geometry, compatible light direction, and the same notebook position where it appears. Reject a beautiful frame if its shade changes shape or its base becomes square. Those are continuity errors the video step may amplify. If you are starting from existing catalog photos, our product-photo-to-video workflow helps you choose source images that can carry motion.
Write one motion prompt per shot
In image-to-video work, the frame already communicates the subject, composition, and style. The text prompt can concentrate on what changes over time. Runway's image-to-video prompting guide makes that distinction and recommends starting with clear motion instructions. Its examples and model-specific behavior should be treated as guidance for that tool, not as a guarantee for every generator. A separate photo-to-video guide similarly favors a focused camera move or action over stacking several competing moves.
For our lamp, the motion can be almost invisible. These are untested starting prompts to adapt after watching the first outputs:
- Shot 1, introduction: “A smooth, very slight push-in toward the lamp. The lamp remains still and centered; the warm pool of light stays steady on the desk. Calm, controlled camera pace.”
- Shot 2, detail: “A tiny lateral camera move across the dome shade and slim stem connection. Keep the visible form and matte surface stable. Gentle, even pace.”
- Shot 3, use: “Locked camera on the lamp and open blank notebook. The illuminated desk area stays steady and calm; the product remains still. Quiet, natural scene.”
- Shot 4, context: “A subtle pull-back reveals more of the same desk around the lamp and notebook. Maintain a stable, level camera and the existing warm light.”
- Shot 5, end card plate: “Static camera and stable product view. Hold the lamp and the open space beside it consistently throughout the shot.”
Notice what the prompts leave out. They do not ask the lamp to unfold, rotate into unseen territory, turn itself on, or reveal controls the reference does not show. They also avoid adding a person whose hands and interaction would introduce another continuity problem. This is a practical choice for a first ad, not a general ban on product demonstrations.
If your first result drifts, revise one variable at a time. Try a stronger “locked camera” direction or a cleaner source frame. If the lamp mutates, fix or replace the reference rather than burying the video prompt in shape descriptions. If the move feels too large, reduce its amplitude. Save the best take for each shot, even if it is not the most dramatic one. The best take is the one that fits the sequence.
For more on shot type and camera vocabulary, read our cinematic AI video prompting guide. If you are new to turning a single source image into motion, the image-to-video workflow guide covers the basic production path. This article's extra step is deciding what the five shots say together.
Generate clips, check continuity, and assemble the ad
Once the frames are approved, take each one into Oxava as a separate image-to-video starting point. For example, use Kling v3 Standard to animate each approved frame with its matching motion prompt; a five-second clip gives you footage to trim for each planned shot. Review results at normal playback speed and keep takes with clean footage around the intended cut.
Kling v3 Standard's multi-shot option can also explore a connected sequence from shot prompts. Treat it as an alternative experiment, not a promise that one 15-second generation will land every cut at the storyboard's exact second. Keep the five-panel plan and finish selection, text, music, and timing in an external editor.
Review the outputs in three passes. First, product truth: same shade, stem, base, color, count, and visible details. Second, cut continuity: the light direction, desk surface, notebook position, and camera side feel compatible from one shot to the next. Third, edit usefulness: there is a clean portion you can trim to 3, 2, 4, 3, or 3 seconds without landing on a distorted frame. Mark rejected takes by reason, not just “bad,” so the next attempt has a specific target.
In an external video editor, place the selected pieces in the table's order. Trim to the 15-second total, then watch without sound. Can you identify the lamp immediately? Does the detail feel like the same object? Does the light shot communicate the calm desk idea? Is the final space clean enough for copy? If the silent version does not tell the story, music will not fix the missing shot.
Add the headline and call to action as editor text over the final plate, rather than asking the video model to render exact words inside the moving image. Keep the text within the safe area of the intended platform and preview it on a phone-sized display. Add music only after the visual rhythm works. Use audio you have the right to use, and check that it does not overwhelm the final message. Export to the placement's required dimensions and watch the encoded file once more; an editor preview is not the final deliverable.
Frequently Asked Questions
How many shots should a 15-second product video have?
Five is a practical starting point for this example, because it gives the viewer an introduction, detail, use, context, and end card. There is no universal count. A simpler product may need three shots; a fast-paced placement may use more, provided each shot has time to register.
Do I need to generate 15 seconds of video in one pass?
No. The storyboard times describe the final cut. You can generate separate clips at the durations your chosen model offers, select useful sections, and trim them in an editor to total 15 seconds.
Can I upload a five-panel storyboard as one image-to-video reference?
Use each panel as a separate shot reference in this workflow. A five-panel grid communicates a plan to a human, but it gives the generator several competing compositions in one frame. Save the approved panels individually and pair each with its own motion prompt.
How do I keep the product consistent between AI video shots?
Use the same verified product reference where possible, define visible invariants, and approve each still before animating it. Check the clips for shape, color, count, and details that the reference actually shows. If a crucial angle is missing from your source material, obtain a real reference rather than asking the model to invent it.
Should I add the CTA inside the AI video prompt?
Reserve a clean final composition in the storyboard, then add exact copy in your editor. That gives you reliable spelling, readable timing, and easy revisions for different placements. The video prompt's job is to keep the end-card plate stable.
Make the storyboard your production filter
A useful answer to how to storyboard an AI product video does more than illustrate an idea. It tells you which frames to create, which motion to request, which clips to keep, and what the final 15 seconds need to communicate. Start with a truthful product and one visible promise; let each shot do one job; leave space for the closing message.
Ready to try the five-shot plan with your own product? Create the reference frames and video clips in Oxava, then bring your selected takes into an editor for the final cuts, text, and sound.
Oxava Team
Egemen Küpçü is the founder of Oxava, with 10+ years of hands-on experience in 3D and visual production. He writes about the craft of generating product, brand and campaign visuals with AI.
Related Articles
ALL POSTS
Subscribe to our newsletter
Be the first to hear about new techniques, model updates and ideas on AI generation.