

You have a product photo, a character concept, or a rough sketch — and you need it as an actual 3D object you can rotate, drop into a game engine, or spin inside an AR viewer on your storefront. Not a picture that looks three-dimensional. A real mesh, with geometry and texture. For years that meant hiring a 3D artist or spending days in Blender pushing vertices. Now you can turn an image into a 3D model with AI in a couple of minutes, and the output is a genuine GLB file you can open in Blender, Unity, or an AR viewer — no modeling required to get the first version.
This is both a straight review and an end-to-end walkthrough. We'll cover what image-to-3D (and text-to-3D) generation actually is, how it works under the hood, where it's genuinely useful beyond a flashy demo, and how to generate your first model step by step in Oxava — which runs Hunyuan 3D v3.1 Pro live. We'll also be honest about what AI 3D still gets wrong, because knowing the limits is the difference between shipping an asset and wasting an afternoon.
What Is Image-to-3D (and Text-to-3D) AI Generation?
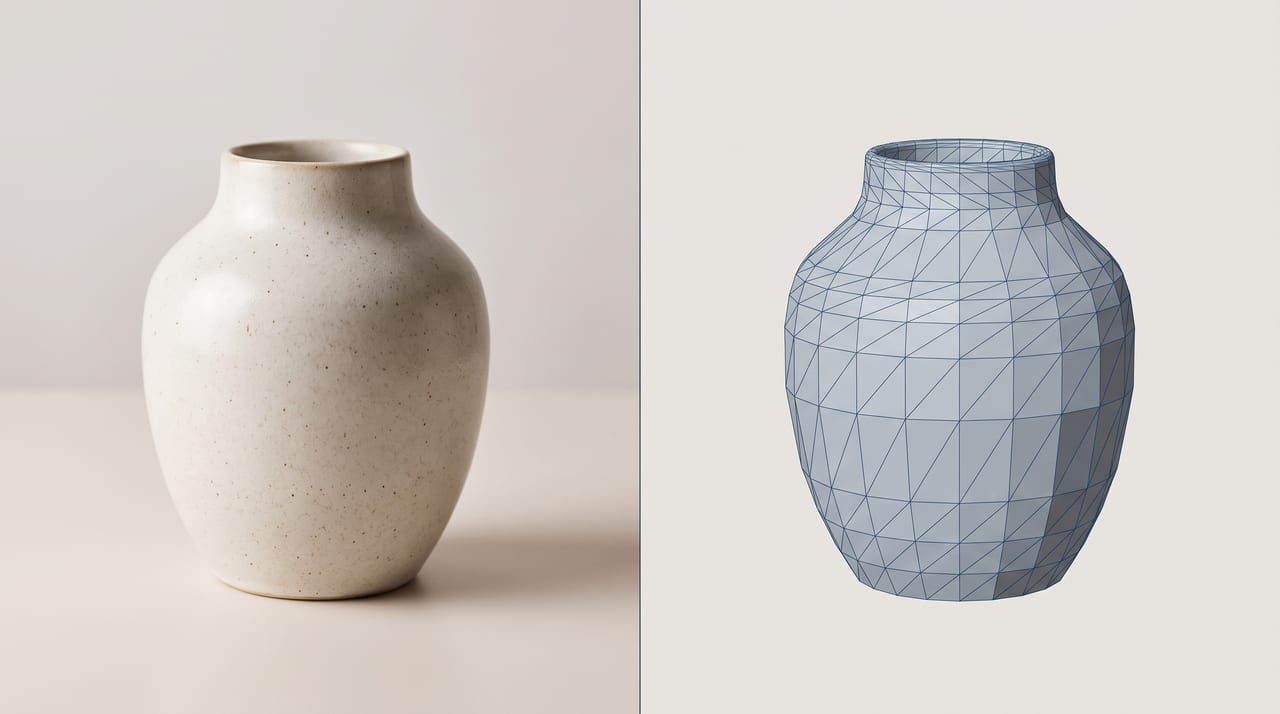
Image-to-3D generation takes a 2D image of an object and reconstructs it as a 3D mesh — a surface built from polygons (faces), wrapped in a texture, saved in a format a 3D program understands. The standard output here is GLB: a compact, self-contained file that packs the geometry and its texture together, and that opens natively in Blender, Unity, Unreal, Godot, and most AR/web viewers. Text-to-3D does the same thing but starts from a written description instead of a photo, so you can generate an object you don't have a reference for.
The word that matters most is real. The result isn't an image — it's geometry. You can rotate it a full 360°, light it from any angle, scale it, and see actual depth, because the object genuinely exists in three dimensions inside the file. That distinction is easy to blur, so it's worth drawing two hard lines against neighboring workflows people confuse this with:
- This is not a "3D-look" image. You can prompt a normal image generator into a clay-render, isometric, or low-poly aesthetic and get something that reads as 3D — but the output is still a flat picture. If that's what you actually want, our AI image style prompt library has copy-paste recipes for exactly those looks. The output of this guide, by contrast, is real geometry you can import into a game engine and manipulate.
- This is the opposite of rendering a model you already have. If you already own a 3D model — a SketchUp scene, a Blender file — and you just need a beautiful 2D still out of it, that's the reverse direction: our guide on how to turn a 3D model into a photoreal render walks through that flow. Here we're going the other way: from a flat image to the model.
How Image-to-3D AI Actually Works (Briefly)
You don't need the math to use it, but a light mental model helps you predict where it will succeed and where it will struggle. Modern image-to-3D systems like Hunyuan 3D are diffusion-based, the same broad family behind image generators — but instead of denoising toward a 2D picture, they denoise toward a 3D shape.
The key trick is multi-view understanding. From your single input photo, the model internally imagines what the object would look like from other angles — the back, the sides, the top — and then reconstructs a consistent mesh that satisfies all those viewpoints at once. That's powerful, and it's also the root of the technology's biggest weakness: any surface the camera couldn't see, the model has to guess (more on that in the limits section).
On top of the geometry, the system synthesizes a texture, and optionally a full PBR (physically based rendering) material set — base color, roughness, metallic, and normal maps. PBR is what makes a surface react correctly to light inside an engine: metal looks metallic, plastic looks matte, and the object holds up when you move a light around it, instead of looking like a flat photo pasted onto a shape. Whether you need PBR depends on your destination, which we'll get into below.
Real Use Cases Beyond the Demo
A rotating asset looks great in a screen recording, but the reason this technology matters is production. Tencent — the team behind Hunyuan 3D — points to a spread of industries already using image-to-3D in real pipelines, and each one maps to a concrete job:
- Game development. The single biggest use. Fast asset creation for props, environment pieces, and background objects — the kind of high-volume, not-hero geometry that used to eat modeling hours. You generate a base mesh, then hand it to an artist for cleanup and retopology instead of building from a cube.
- E-commerce and AR. Turn a product photo into a 3D model for an interactive viewer or an AR "place it in your room" experience — the format buyers increasingly expect on higher-consideration purchases. It pairs naturally with a strong 2D catalog; if you're still building that foundation, our AI product photography guide covers the image side that feeds directly into a 3D pipeline.
- Film, advertising, and VFX. Rapid previs and background assets, where a "good enough" model fills a frame that the audience never scrutinizes up close.
- Prototyping and design. Quickly get a rough physical form to iterate on before committing to a proper CAD or sculpting pass.
- Social content and 3D printing. Everything from animated stickers to a printable figurine — with the printing caveat we cover in the limits section.
Tencent also reports serious adoption around the underlying models — millions of downloads on Hugging Face and integrations across enterprise partners including tooling in the Unity and consumer-3D-printing ecosystems. Treat exact figures as the vendor's own numbers, but the direction is clear: this has moved past novelty into day-to-day asset work.
Step by Step: How to Turn an Image Into a 3D Model with AI in Oxava
Oxava runs Hunyuan 3D v3.1 Pro live in the studio at /app/3d, on a surface called the Vertex Stage — a live 3D preview where you can orbit the result the moment it finishes, before you download anything. Here's the full flow.
1. Prepare your input image
Garbage in, garbage out applies harder here than in 2D generation, because the model is inferring an entire hidden half of the object from what you give it. The best-practice checklist, drawn from across the image-to-3D field:
- One subject, centered. A single clear object, not a busy scene with three things competing for attention.
- Clean, plain background. A neutral, uncluttered backdrop helps the model separate the object from its surroundings.
- Even, diffuse lighting. Avoid hard shadows that the model might bake into the geometry, and avoid strongly reflective or transparent surfaces (glass, chrome), which confuse depth estimation.
- Enough resolution. Hunyuan 3D accepts inputs from a minimum of 128px and up to 8MB — but bigger and sharper is better. Give it detail to work with.
2. Choose your settings
Before you generate, four controls shape the output. Here's what each does:
- generate_type: Normal or Geometry. Normal gives you a textured mesh — the full object with its surface color. Geometry gives you the raw, untextured shape only. Pick Geometry when you plan to do your own texturing, need a clean form for 3D printing or CAD reference, or just want the topology.
- PBR materials (on/off). Turn this on when the model is headed for a game engine or a lit render and you need it to respond correctly to lighting. Skip it if a flat baked texture is fine — for example, a quick preview or a simple viewer.
- Multi-view (on/off). If you have extra photos of the object from other angles, feed them so the model doesn't have to invent the hidden surfaces. v3.1 accepts up to seven extra views — back, left, right, top, bottom, and two front-quarter angles. This is the single biggest quality lever when the object has an important, non-symmetric back side.
- face_count (mesh density). This is your polygon budget. The Standard preset is 500k faces; High is 1.5M, within a supported range of roughly 40k–1.5M. Lower means a lighter file for real-time, mobile, and AR; higher means more detail for a hero render you'll see up close.
3. Generate, preview on the Vertex Stage, and download
Run it, orbit the result on the Vertex Stage to check the hidden surfaces and the silhouette, and download. You get a GLB mesh plus a thumbnail, and the individual OBJ / MTL / texture files if your pipeline prefers those.
Cost — deterministic, no surprises
Pricing is a flat, predictable formula in credits, so you always know the cost before you click:
| Option | What it does | Cost |
|---|---|---|
| Base generation | GLB mesh + thumbnail + OBJ/MTL/texture | 38 credits |
| PBR materials | Physically based material set for correct lighting | +15 credits |
| Multi-view | Use extra-angle reference images (charged once) | +15 credits |
| Custom face count | Go above/below the 500k default (e.g. High/1.5M) | +15 credits |
So a bare mesh is 38 credits, and a fully-loaded generation — PBR + multi-view + custom face count — lands at 83. There's no metered true-up and no hidden variable cost: the number you see is the number you pay.
One access note, stated plainly rather than buried: 3D generation is available on the Pro and Premium plans and is locked on Starter. If you're on Starter and want to try it, you'll upgrade to Pro or Premium first — but the feature is right there in the studio, not hidden behind a waitlist.
Text-to-3D: When You Don't Have a Reference Photo
Sometimes you don't have — and can't easily shoot — a reference image. That's what text-to-3D is for. Same model, same output formats and pricing; you just describe the object in a prompt of up to 1,024 characters instead of uploading a photo.
Reach for text-to-3D when:
- The object is imaginary or stylized — a fantasy prop, a game item, a mascot — with no real-world reference to photograph.
- You want a quick concept mesh to iterate on before you've committed to a design.
- Shooting a clean reference photo is more hassle than describing the thing.
Keep the prompt tight and concrete. A reliable formula:
[object] + [material/finish] + [style] + [notable details] + [shape/silhouette]
For example: "a low-poly wooden treasure chest, iron hinges and a domed lid, stylized game-asset look, slightly worn edges." Describe the form and material, not a scene or a mood — text-to-3D wants to know what the object is, not what the lighting feels like. If your description drifts toward atmosphere, you're writing an image prompt, not a 3D prompt. Image-to-3D still wins on fidelity when you do have a good photo, because a real reference beats a described one — but text-to-3D is the faster path from pure idea to first mesh.
PBR, Multi-View & Face Count: Which Add-Ons Do You Actually Need?
The add-ons are cheap individually, but stacking all three by reflex is a habit worth breaking — half of them are irrelevant to a given job. Match the add-on to the destination:
| Your goal | PBR? | Multi-view? | Face count |
|---|---|---|---|
| Real-time game asset (Unity/Unreal) | Yes | If back matters | Standard (lighter) |
| AR / web product viewer | Yes | Yes (product back visible) | Standard |
| Hero render / close-up beauty shot | Yes | Yes | High (1.5M) |
| 3D-printing base form | No (Geometry) | If asymmetric | High for detail |
| Quick concept / prototype | No | No | Standard |
The rules of thumb behind the table: PBR earns its 15 credits any time the model gets lit in an engine or a renderer — and is wasted when you only need a flat preview or you're printing an untextured form. Multi-view is the highest-impact add-on for any object with a meaningful, non-symmetric back (a shoe, a car, a character) and pure waste for something radially symmetric like a vase. High face count is for detail you'll actually see up close; for real-time and mobile, more polygons is a cost, not a benefit — heavier files, worse performance. Spend where the viewer will notice.
Honest Limits: What AI 3D Generation Still Gets Wrong
Independent reviews of the Hunyuan 3D family land on a consistent, fair verdict: it's remarkable, and it's a starting point, not a final delivery. Knowing these edges up front saves you from expecting the wrong thing:
- Hidden surfaces are guessed. The back and interior the input never showed get invented, and the guess can be wrong or bland. This is exactly why multi-view matters — every extra angle you supply is one less surface the model has to hallucinate.
- Topology is messy. AI-generated meshes often have uneven, non-manifold geometry that isn't clean enough for rigging or animation as-is. For anything that has to deform or ship into a production pipeline, budget for a retopology pass.
- Fine and thin detail softens. Delicate structures, sharp edges, and surface text or logos can come out mushy or lost. Don't expect crisp small print or hair-thin geometry.
- Formats are honest but limited. You get GLB plus OBJ / MTL / texture — and that's it. There's no native STL, USDZ, or FBX export. That matters in two common cases: for 3D printing, you'll convert GLB/OBJ to STL and almost certainly run a repair/watertight pass in a slicer or mesh tool before it prints cleanly; for iOS AR Quick Look (USDZ), you'll convert from GLB. Neither is hard, but both are extra steps — don't assume the download is print-ready.
None of this is a reason to skip the tool. It's a reason to place it correctly: AI 3D gets you from zero to a solid base mesh in minutes, and a human (or a cleanup pass) takes it the last mile. That's a massive time save on the 80% that used to be pure grind — just not a one-click replacement for a finished, production-grade asset.
Where This Fits in the Broader AI Toolkit
3D is one modality among several, and the smart move is matching the tool to the deliverable rather than forcing everything through one model. If your endpoint is a flat image after all — a listing photo, an ad, a hero visual — a dedicated image generator is the right call, and our roundup of the best AI image generators of 2026 maps that whole field. If you already have geometry and need a beautiful still, that's the 3D-model-to-render workflow. Image-to-3D earns its place specifically when you need real, manipulable geometry — a mesh you can rotate, light, print, or drop into an engine — and nothing flat will do.
Frequently Asked Questions
What file formats does AI image-to-3D output?
In Oxava, Hunyuan 3D v3.1 Pro outputs a GLB mesh (geometry and texture in one file) plus separate OBJ / MTL / texture files and a thumbnail. GLB opens natively in Blender, Unity, Unreal, Godot, and most web/AR viewers. There's no native STL, USDZ, or FBX — for 3D printing you'll convert to STL (and likely run a repair pass), and for iOS AR Quick Look you'll convert GLB to USDZ. Both conversions are straightforward with free tools.
How much does it cost to generate a 3D model?
Pricing is deterministic. A base generation is 38 credits, which includes the GLB mesh, thumbnail, and OBJ/MTL/texture files. Three optional add-ons cost +15 credits each: PBR materials, multi-view (using extra-angle reference images), and a custom face count outside the 500k default. A fully-loaded model with all three is 83 credits. There's no metered surcharge — the price shown is the price paid.
Can I use AI-generated 3D models commercially and in a game engine?
The GLB output drops directly into Unity, Unreal, Godot, and Blender, so game-engine use is exactly what it's built for — typically after a cleanup or retopology pass for anything that needs to animate. For commercial rights, check the current terms for your plan and region before building generated assets into client or shipped work, rather than assuming the default license covers every use.
Image-to-3D or text-to-3D — which should I use?
Use image-to-3D when you have a clean reference photo of the object — a real reference produces higher fidelity than a described one. Use text-to-3D when the object is imaginary, stylized, or simply not worth photographing, describing it in a prompt of up to 1,024 characters. Both run on the same model with the same output formats and pricing, so the only question is whether you're starting from a picture or an idea.
Do I need 3D experience to use this?
No — generating a first model takes no 3D skills at all: prepare a clean photo (or write a short prompt), pick your settings, and download the GLB. Where experience helps is after generation: cleaning up topology, retopologizing for animation, or prepping a mesh for 3D printing. For a rough preview, previz, or a base to hand to an artist, you can go from image to model with zero modeling background.
The Bottom Line
Turning an image into a 3D model with AI has gone from research demo to a genuinely useful production shortcut. You upload a photo (or type a description), choose whether you need PBR, extra angles, or higher detail, and a couple of minutes later you're orbiting a real GLB mesh you can drop into an engine, an AR viewer, or a printing pipeline. It won't hand you a flawless, animation-ready hero asset — hidden surfaces get guessed, topology needs cleanup, and there's no native STL — but it collapses the slow, grinding 80% of asset creation into a single generation.
Hunyuan 3D v3.1 Pro is live now in the Oxava studio at /app/3d — image-to-3D and text-to-3D both available, with the Vertex Stage preview so you can inspect the result before you commit. 3D generation runs on the Pro and Premium plans, so if you're on Starter you'll upgrade first. The fastest way to know whether AI 3D belongs in your workflow is to run one of your own product photos or concepts through it — so grab an image, open the studio, and generate your first mesh.
Egemen Küpçü
Egemen Küpçü is the founder of Oxava, with 10+ years of hands-on experience in 3D and visual production. He writes about the craft of generating product, brand and campaign visuals with AI.
Related Articles
ALL POSTS


Subscribe to our newsletter
Be the first to hear about new techniques, model updates and ideas on AI generation.