

You generated a mesh. It orbits beautifully in the preview, the silhouette is right, the texture reads convincingly. Then you drag the GLB into your engine and it lands at the wrong scale, carrying a few hundred thousand triangles, no collision, no LODs — and geometry that folds in on itself the moment you bend an elbow. Working with AI 3D models for game assets is genuinely practical now, but only if you know which half of the job the model does and which half is still yours.
This guide picks up where our walkthrough on how to turn an image into a 3D model with AI left off — that one covers generating your first mesh, so we won't repeat it here. The GLB already exists; the question is what stands between that file and an asset an engine is happy to render sixty times a second.
"It Generated" Isn't the Same as "It's Game-Ready"
Generation solves two problems: shape and surface. It gives you a form that looks like the thing you asked for, wrapped in a texture that reads at a glance — a lot of work compressed into a couple of minutes.
"Game-ready" isn't an aesthetic judgment, though — it's a contract with the runtime. An asset is game-ready when it fits a polygon budget for the platform, has topology that supports what it must do, carries usable UVs and separated PBR channels, ships with LODs, and has collision, a sane pivot, and correct scale and axis. A generated mesh usually arrives with the first two partly satisfied and the rest missing. Budget for a finishing pass instead of expecting a drop-in.
One clarification, because these workflows get confused: this guide is about taking a generated mesh into a game. If you already own a model and need a beautiful still image out of it, that's the opposite direction — our guide on turning a 3D model into a photoreal render covers that flow.
Where AI 3D Models for Game Assets Actually Earn Their Place
The honest answer to "can AI make my game's art?" is: a specific slice of it, very fast — and it will waste your time on the rest. Knowing the boundary is the whole skill.
Props, clutter, and kit-bashing
The sweet spot. Crates, tools, food, furniture, rocks, signage, market stalls — the background objects that fill a level and used to eat modeling days for little payoff. A generated base mesh here is often 80% of the finished asset, and kit-bashing amplifies it: generate variations of a shape family, then cut and recombine pieces into new objects. Since you're chopping the mesh up anyway, minor topology sins matter less.
Blockout and greybox speed
Greyboxing is where AI 3D quietly pays for itself. Instead of imagining whether an arch reads at the right scale in a room of grey cubes, generate a rough version of the real object in a minute and place it — decisions get made against something closer to the truth, and since these meshes are disposable, nobody cares about their topology.
Where a human is still required
- Hero characters. The thing the player looks at for forty hours — face, hands, silhouette, deformation under animation. AI output isn't there, and pretending otherwise costs more time than it saves.
- Key story objects. The cutscene artifact, the weapon on the promo art — anything the camera holds on gets inspected, and generated detail softens under scrutiny.
- Strict style consistency. Under a tight art direction, generated assets drift unless an artist pulls them back.
AI handles volume, humans handle focus: use it for the hundred props nobody notices, and keep artists on the ten objects everybody notices.
The Technical Bar: What "Game-Ready" Actually Means
Four things decide whether your mesh behaves in an engine.
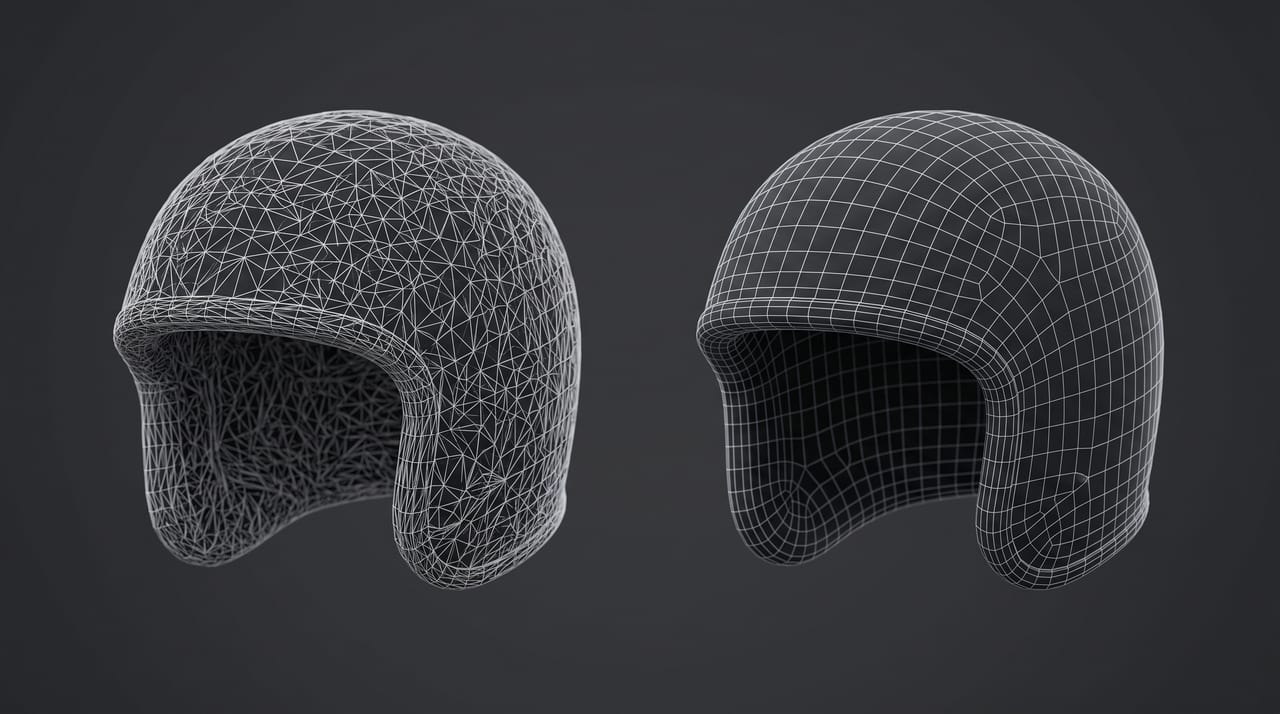
Quad vs triangle topology
Engines render triangles — everything is triangulated at draw time, so in a narrow sense the question is moot. It matters because of what happens before that.
Quads are what you want when the mesh will be edited, subdivided, or deformed: quad grids produce predictable edge loops, which is what makes a shoulder bend correctly and manual cleanup in Blender sane. Triangles are fine — often preferable — for static geometry that ships as-is. A rock, a crate, a fence will never be subdivided, so triangulation is one less conversion step and a slightly smaller file. The rule: if it moves or you'll edit it, ask for quads.
Polygon budgets by platform
There's no universal number, but published guidance converges on usable bands. Meshy's remesh documentation gives per-platform targets; Tripo3D publishes character-specific budgets. Side by side:
| Destination | General target (Meshy) | Character budget (Tripo3D) |
|---|---|---|
| Mobile AR / casual | under 5K polygons | 2K–15K triangles |
| Mobile game / web | 5K–20K polygons | 2K–15K triangles |
| PC / console | 20K–50K polygons | 5K–40K triangles |
| High-quality render | 50K–100K polygons | — |
| Cinematic / film | 100K+ polygons | 40K–80K+ triangles |
A caveat almost nobody states out loud: these columns aren't in the same unit. A quad is two triangles, so a 20K-polygon budget quoted in quads is roughly a 40K triangle budget once the engine has it. Confirm which unit you're reading before you compare against your engine's stats panel — getting this wrong by a factor of two is the most common polygon-budget mistake there is.
Note also where generated meshes start: far above all of these, often hundreds of thousands of faces of largely wasted density. Remeshing down to a target isn't optional polish — it's what makes the asset usable at all.
UV unwrap and PBR channels
Texture is really two things: a UV layout (how the 3D surface is flattened into a 2D square) and the maps painted into it. Generated assets give you both automatically, with two honest limits: typical AI texture resolution lands in the 1024–2048px range — plenty for a background prop, thin for a close-up — and the layout is machine-made, functional but rarely elegant. If you'll hand-paint details or overlay decals, expect to re-unwrap.
The maps matter more than most people realize. A proper PBR set exports as separate channels: albedo (base color with no lighting baked in), normal (fakes fine detail without geometry, which is how a low-poly mesh still looks detailed), roughness (polished versus worn), and metallic. An asset that ships as one flat image with lighting cooked into it looks wrong the moment your scene's lighting differs from the generator's.
Why one mesh is never enough: LODs
An LOD chain is several versions of the same asset at decreasing density — full detail up close, simpler as it recedes. It exists because rendering a 30K-triangle crate that occupies nine pixels is pure waste, and two hundred such crates is a frame-rate problem. Generated assets arrive as a single mesh, so LODs are something you add: remesh lighter versions yourself, or let the engine auto-generate them, which is good enough for background props.
Turning a Generated Mesh Into a Character That Can Move
Characters raise the bar. A prop only has to look right; a character has to look right while deforming, which is a different demand on the geometry.
Auto-rigging needs a clean T-pose or A-pose
Auto-rigging works by recognizing a humanoid layout and placing a skeleton inside it. That recognition depends on a neutral pose — T-pose or A-pose — with limbs separated and not intersecting the body.
So the rigging problem starts at the input image. Feed the generator a dynamic, foreshortened, action-posed reference and you get a dynamic, action-posed mesh, which auto-rigging will either refuse or rig with joints in the wrong places. Generate characters from a flat, front-facing, neutral-pose reference with clearly separated arms and legs. That one choice decides whether the rest of the character pipeline is even possible.
Edge flow at the joints is the real bottleneck
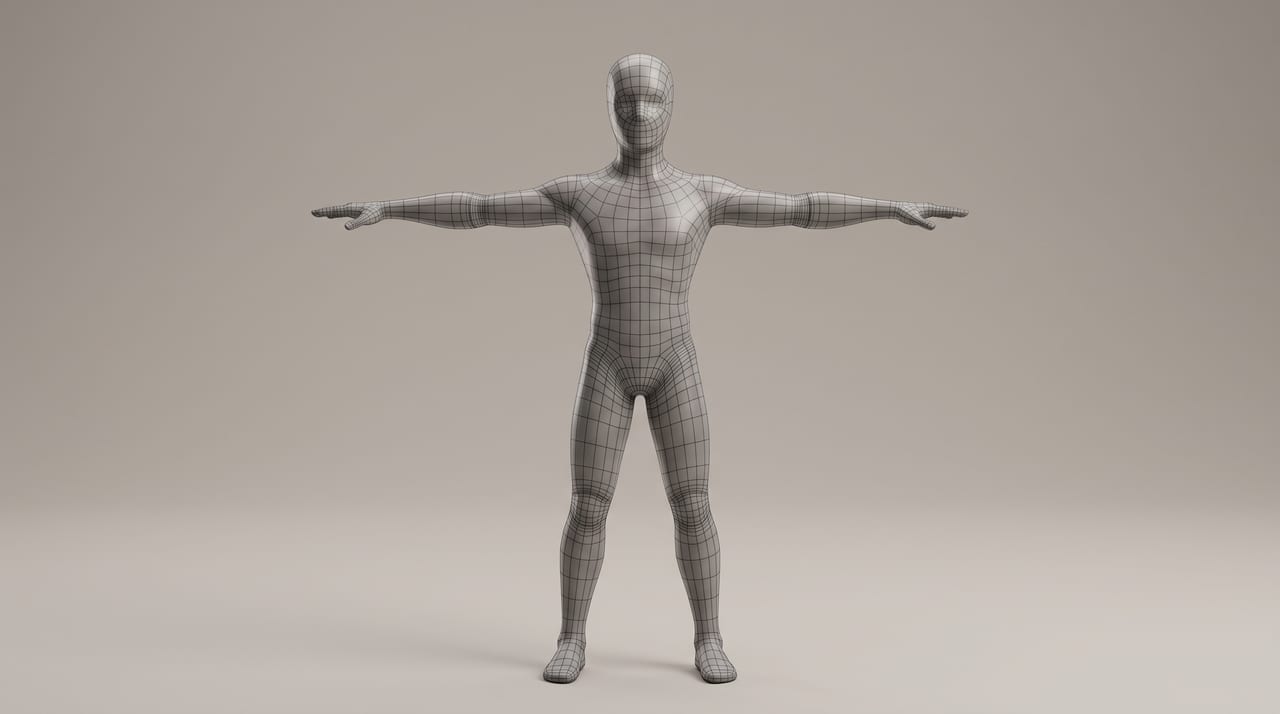
Rigging binds vertices to bones. When a bone rotates the vertices follow — and whether the result looks like an elbow or a crumpled paper bag depends on how polygons are arranged around that joint. You want loops of quads running around the limb, several concentrated where it bends, so the surface can compress on the inside and stretch on the outside.
Generated meshes rarely have this: their density follows visual detail, not deformation, so a joint may get a chaotic patch of thin triangles with no coherent loops. That's where topology stops being cosmetic and becomes functional — the well-documented split in generated 3D is that topology on static props is usually good enough, while on anything that deforms it is hit or miss.
Hero characters still need manual retopology
For a background NPC seen at a glance, an auto-rigged generated mesh with imperfect joints is fine. For a playable character under a third-person camera it isn't: that asset gets a manual retopology pass, where an artist rebuilds a clean quad surface over the generated form and transfers detail onto it with normal maps. The generation isn't wasted — retopologizing over an existing form is far faster than sculpting from a sphere. The AI did the blocking; the human did the engineering.
Generating Game-Ready Assets in Oxava (Meshy v7)
Most generators hand you a mesh and leave game-readiness to you. Oxava runs Meshy v7 live in the studio at /app/3d, exposing several of the steps above as controls at generation time — topology, polygon target, low-poly mode, rigging, animation.
One thing up front: Meshy v7 is image-to-3D only — there's no text-to-3D mode on this engine. Starting from an idea rather than a picture? Generate a clean concept image first and feed that in.
Pick the geometry tier by what the asset is for
The tiers are mutually exclusive — you pick one, they don't stack:
| Tier | What you get | Cost |
|---|---|---|
| Base (untextured) | Geometry only, no texture | 80 credits |
| Textured | Full mesh with generated texture | 120 credits |
| Ultra | Textured at the highest quality setting | 140 credits |
Choose untextured when you're texturing in your own pipeline anyway, when it's a blockout, or when the project has a strict shared material library. Textured is the ordinary case. Reserve ultra for assets the camera gets close to.
The game-ready controls
- Topology: quad or triangle. Quads for anything that deforms or gets edited, triangles for static geometry.
- Target polygon count. The accepted range is 100 to 300,000 polygons, defaulting to 30,000. Note where that default sits: inside the PC/console band and well above a mobile budget. Shipping to mobile means dialing it down deliberately.
- Model type: standard or lowpoly. Standard respects your topology and polygon target. Lowpoly is a different mode, not a smaller number — it produces a stylized faceted look and handles density its own way, so the remesh controls stop applying. Pick one lever or the other.
- Texture guidance. Steer the surface with a texture prompt or a reference texture image — useful for matching a material language across a set of props. Describing finish precisely is its own small craft; our AI style prompt guide has the vocabulary. Input images are JPG or PNG.
Skeleton and animation in the same pass
For characters, two optional add-ons run in the same generation. Auto-rigging (+20 credits) places a skeleton inside the mesh so it can be posed and animated. Animation (+12 credits) applies a preset from a large library addressed by ID — 0 is Idle, running up to 696. Animation requires rigging, and the dependency is enforced, so you can't pay for an animation that can't be applied. Pricing here is flat: cost comes from the flags you pick, not a metered surcharge afterward.
Where the Hunyuan engines fit
Two other engines cover a different part of the problem. Hunyuan 3D Rapid — 23 credits base, +15 for PBR, with both text-to-3D and image-to-3D — is the blockout and idea-testing tier: several rough silhouettes for the cost of one game-ready pass (prompts cap at 200 characters, so keep them to object, material, form). Hunyuan 3D Pro — 38 credits base, +15 each for PBR, multi-view reference angles, and custom detail — is the highest geometry quality of the three, for when form matters more than topology controls.
A workflow using all three: prototype silhouettes cheaply in Rapid, settle the design, then produce the shipping asset in Meshy v7 with the topology and polygon budget your platform needs. All three output GLB; the Hunyuan engines also give you OBJ, MTL, and texture files as a package.
From GLB to Engine: An Import Checklist
Scale and axis
The number one cause of "my model imported wrong," and rarely the model's fault — engines disagree about coordinate systems and units. Godot is the easiest target: it imports GLB natively and shares glTF's Y-up, metric convention. Unreal works in Z-up with centimeter units, so a Y-up, meter-scale glTF gets converted on import — verify rather than assume, since a common symptom is an asset arriving at 1/100th or 100× the expected size. Unity is Y-up and metric like glTF, but depending on your version glTF import may come from a package rather than the core editor; if GLB won't import, add a glTF importer package or route through Blender and export FBX.
The universal fix is a habit, not a setting: drop a known-scale reference object into the scene — the default capsule, a character controller, a 1-meter cube — and eyeball your asset against it right after import. Check the pivot while you're there: generated meshes are usually centered on their bounding box, which is wrong for anything that sits on the floor or rotates on a hinge.
Collision and LODs
Neither comes in the file. For collision, don't use the render mesh as a collider — a 30K-polygon collision mesh is expensive and, for dynamic objects, often not even allowed. Use primitives (box, capsule, sphere) for anything that moves and a simplified convex hull for static geometry with a complex form; per-triangle collision is for terrain and level geometry, not props. For LODs, set the chain up after import with your engine's built-in system.
The Blender cleanup pass
Sometimes you need one, sometimes you don't — skip it for a static background prop that imports at the right scale and reads correctly. Do the pass when you see floating fragments, interior geometry nobody will ever see, inverted normals (surfaces that vanish from one side), doubled vertices, or a pivot in the wrong place. The short version: delete stray and interior geometry, merge doubles by distance, recalculate normals outward, set the origin where it belongs, apply transforms so scale reads as 1, and decimate only if you're still over budget after remeshing.
Licensing and Disclosure Before You Ship
Rights. Check the current terms of the tool you generated with, for your plan and region, before building generated assets into shipped or client work — don't assume a default license covers commercial distribution.
Platform disclosure. Steam's AI disclosure requirements are scoped, as of 2026, around AI-generated content that is consumed by players — art, models, audio, and text that appear in the shipped game, as opposed to behind-the-scenes efficiency tools nothing AI-generated ever reaches. A generated 3D asset in your level sits in the first category, so plan to disclose it — that's a form, not a rejection, though check the current version before you submit since these policies keep evolving.
Frequently Asked Questions
Can AI-generated 3D models be used in commercial games?
Generally yes, though it depends on the tool's licensing terms for your plan and region — check rather than assume. Technically there's no obstacle: GLB imports into Unity, Unreal, Godot, and Blender, and a remeshed, rigged asset behaves like any other. Handle two things before shipping: the license itself, and any platform disclosure requirement, such as Steam's rules for AI content players see.
Do AI 3D models come rigged?
Not by default — most generators output an unrigged static mesh. Some, including Meshy v7 in Oxava, offer auto-rigging as an add-on (+20 credits) that inserts a skeleton during generation, with an optional preset animation on top (+12 credits, requires rigging). Auto-rigging works best from a clean T-pose or A-pose with separated limbs — why the input image matters so much for characters.
What polygon count should I target for a mobile game asset?
Published guidance puts mobile AR and casual assets under about 5K polygons and mobile game or web assets in the 5K–20K range; for characters specifically, roughly 2K–15K triangles. Watch the units — quads versus triangles differ by a factor of two. Meshy v7's default polygon target in Oxava is 30,000, which suits PC and console, so lower it deliberately for mobile.
Can I animate an AI-generated character?
Yes, with a caveat about quality. If the mesh is in a neutral pose and auto-rigging succeeds, you can apply animation immediately — in Oxava you can attach a preset animation in the same generation. How good it looks depends on topology at the joints: without clean edge loops at shoulders, elbows, hips, and knees, deformation gets ugly. Background characters usually pass; hero characters typically need retopology first.
Should I use quad or triangle topology for game engines?
Engines triangulate everything at render time, so the choice is about what happens before that. Use quads for anything you'll deform or edit — characters, creatures, cloth, any mesh headed for Blender — because quad edge loops subdivide and bend predictably. Use triangles for static geometry that ships as generated: props, rocks, architecture. When in doubt on a character, choose quads.
The Bottom Line
The gap between generating AI 3D models for game assets and actually shipping them is a known, finite list: hit the polygon budget, match topology to the job, keep PBR channels separated, add LODs and collision, and get characters into a neutral pose before rigging. It's the same checklist a marketplace asset goes through — the slow part, building the form, now just takes minutes.
The fastest way to internalize it is to run one real asset through the pipeline. Open the 3D studio at /app, generate a prop with Meshy v7 using quad topology and a polygon target that matches your platform, add auto-rigging if it's a character, and import the result into your engine today. That round trip teaches more than any checklist — where the topology held, where scale surprised you, what your cleanup pass actually needs. Haven't generated a first mesh yet? Start with the image-to-3D walkthrough and come back once a GLB is sitting in your downloads folder.
Egemen Küpçü
Egemen Küpçü is the founder of Oxava, with 10+ years of hands-on experience in 3D and visual production. He writes about the craft of generating product, brand and campaign visuals with AI.
Related Articles
ALL POSTS

Subscribe to our newsletter
Be the first to hear about new techniques, model updates and ideas on AI generation.