
It's Monday, your content calendar says you owe thirty posts this month across four platforms, and you have exactly one half-decent photo to work with. If you've been wondering how to create social media visuals with AI for your brand, this is exactly where that skill pays off. The quiet panic behind most small brands' social media isn't a lack of ideas — it's the sheer volume of visuals modern feeds demand: a square for the grid, a vertical for stories, a banner for LinkedIn, a profile photo that reads at thumbnail size — each in a different shape, each supposed to look like it came from the same brand. Hiring a designer for all of it is out of budget. Making it by hand is out of time. So most brands ship whatever they have, and the feed ends up looking like a yard sale.
This guide is about the third option: building a single, repeatable visual kit with AI rather than thirty one-off scrambles. We'll build it from scratch — define a visual DNA once, then generate a full set across every format your brand actually needs, keeping them coherent at scale. By the end you'll have a repeatable workflow that turns "thirty posts this month" from a dreaded chore into an afternoon's work. Not a pile of random AI pictures, but a kit: a feed grid, a story series, a profile photo, and cover banners that all clearly belong to the same brand.
Why your social media visuals look inconsistent (and what fixes it)
Open most small-brand feeds and you'll feel it before you can name it: one post is warm and filmic, the next is cold and clinical, a third has a teal cast nobody asked for. Each image might be fine alone, but lined up in a grid they look like five different companies. That incoherence isn't a talent problem — it's a systems problem. When every visual is made from scratch in the moment, with whatever tool and mood you had that day, drift is the default.
There are three culprits, and naming them tells you exactly what to fix:
- No shared recipe. You describe the look fresh each time, so Tuesday's post says "bright and airy" and Friday's says "moody editorial" because that's what the brief felt like. Without a fixed vocabulary, the brand has no fixed face.
- The format scramble. A feed square, a 9:16 story, and a wide banner are three different shapes. Rebuild each by hand and they inevitably diverge — different crops, different framing, different energy.
- Source soup. A phone photo here, a stock image there, an AI generation somewhere else, all with different lighting and color science. Mixed sources read as mixed brand.
The cost is real. Research on branded social content consistently finds that visual coherence is one of the fastest signals a viewer uses to judge whether a brand is "put together" — a shopper forms that impression in under a second of scrolling. A consistent feed builds recognition (people know your post before they read the handle); an inconsistent one throws that recognition away with every upload.
The fix is the premise of this whole guide: stop treating each post as a one-off and start treating your visuals as a kit produced by a repeatable system. Define the look once, lock it, and apply it across formats. AI is what makes the "apply it across formats" part nearly free — but only if you give it a fixed brand to apply. The rest of this guide builds that system, format by format.
The four formats every brand needs (and their specs)
Before you generate anything, get clear on what you're generating. A complete social visual kit isn't a hundred bespoke images — it's four core format families, each with its own aspect ratio and its own composition rules. Nail these four and you cover the vast majority of what every platform asks for.
| Format | Aspect ratio | Where it lives | Composition rule |
|---|---|---|---|
| Feed post | 1:1 or 4:5 | Instagram, Facebook, LinkedIn grid | Centered, balanced; 4:5 takes more vertical real estate in-feed |
| Story / Reel | 9:16 | Instagram, TikTok, Facebook, YouTube Shorts | Keep the subject in the central band — top and bottom get covered by UI |
| Profile photo | 1:1 (displays as a circle) | Every platform's avatar | Subject dead-center, readable at thumbnail size, generous margin |
| Cover / banner | 16:9 and wide (e.g. LinkedIn ~4:1) | LinkedIn, Facebook, YouTube headers | Off-center subject, large clean area for text; mind platform-specific safe zones |
A few specifics worth internalizing, because they're where DIY kits usually break:
Feed: square vs. 4:5. The classic feed post is 1:1, but most platforms now let images run taller at 4:5, which claims more screen as someone scrolls. Pick one as your default and stick to it — a grid that mixes squares and tall crops looks restless. For a planned grid (where nine posts form one coherent block of your profile), commit to a single ratio across all nine.
Story / Reel: respect the safe zone. A 9:16 frame looks full-screen, but the top ~14% and bottom ~20% get covered by the profile chip, caption, and action buttons. Anything important — your product, a face, a key line — has to live in the central band, or the platform crops it for you. Generate with that empty margin built in.
Profile photo: it's a circle, and it's tiny. Most platforms mask your avatar into a circle and display it at a few dozen pixels. A busy, detailed image turns to mush. Design for the thumbnail: one clear subject, centered, with breathing room so the circular crop doesn't lop off anything that matters.
Cover / banner: leave room for words. Banners almost always carry a headline or tagline, and you add that text as a separate layer afterward (more on why below). So generate the banner with deliberate negative space — "subject to the right, clean open area on the left for a headline." And check each platform's safe zone: a LinkedIn banner, for instance, gets partly covered by your profile photo in the lower-left, so keep that corner clear.
Getting these specs right up front is what separates a kit that fits from one you're forever re-cropping. Decide your default feed ratio, your story safe margins, and your banner text zones now — they become fixed settings you reuse for every batch.
Building your visual DNA: colors, mood, and a master prompt
Here's the move that turns thirty scrambles into one kit: before you generate a single post, you define your visual DNA — the look that stays constant across every format — and freeze it into a reusable master prompt. This is the highest-leverage half-hour in the whole process, because everything downstream just inherits it.
Your visual DNA has three layers. Write each down explicitly; vague intentions don't survive contact with a generator.
Colors — by hex, not by name. "Blue" is a guess; #0F4C81 is an instruction.
Pull your brand's actual palette — primary, secondary, and an accent — and write the
hex codes into a note. Then translate them into prompt-friendly language the model can
act on: not just the codes but "deep navy and warm sand tones, muted, low saturation."
Color drift is the single fastest way a feed starts looking off-brand, so this layer
matters most.
Mood — three or four concrete words. Decide once whether your brand is bright and airy or moody and editorial, playful or premium, warm or clean. Pick the words and commit. "Soft natural daylight, calm, premium, generous negative space" is a mood you can reuse a hundred times; "nice vibes" is not.
Reference images — your ground truth. Collect a tight set of 8–15 images that define your look — your best on-brand shots plus a couple of pure color and lighting references. You'll feed these to the model as a style anchor so it matches your version of "soft editorial" instead of a generic one. Curate ruthlessly: if an image is only "kind of us," cut it.
Now fold all three into a master prompt — a fixed block of text you'll paste into every generation. The trick is to split your prompt into two halves: a variable half (the subject and scene, different every post) and a fixed half (your brand DNA, identical every time).
[VARIABLE — the subject/scene for this specific post]
+ [FIXED — your brand DNA block, word-for-word every time]
Here's a worked example for a fictional skincare brand:
❌ One-off (drifts): "A serum bottle, nice clean look, soft light"
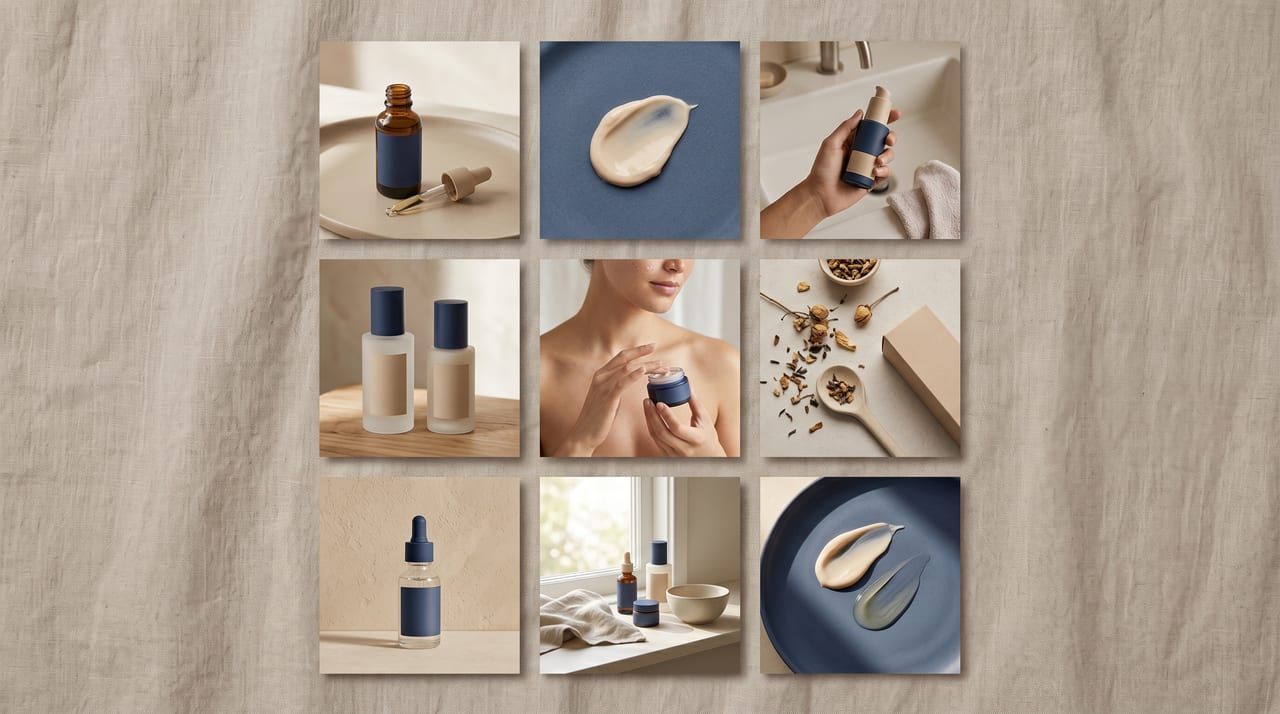
✅ Master-prompt (consistent): "A frosted-glass serum bottle on a pale stone surface" + fixed block → "...soft natural daylight from the left, deep navy and warm sand palette, low saturation, minimal composition with generous negative space, shot on 50mm with shallow depth of field, calm premium editorial mood, subtle film grain"
Tomorrow, when you post a moisturizer instead of a serum, you keep that entire fixed half identical and change only the first phrase. The two posts come out looking like siblings because they share the same DNA, word for word. One more anchor seals it: many generators let you lock the seed (the random starting number behind an output). Note a "golden seed" that produces a beautifully on-brand result, and reuse it across a tight series for an extra layer of coherence.
This visual-DNA system is the foundation of everything on-brand, and it deserves a deeper look than we can give it here. Our complete AI brand visual consistency guide walks through building the reference set, writing and versioning the fixed block, anchoring with seeds and reference images, and reviewing outputs against a checklist — it's the companion read that makes this section bulletproof. And if you want to sharpen the prompt-writing craft itself — how to layer a description so the model actually delivers — the guide to writing AI image prompts is the deeper reference.
Generating your full kit: a platform-by-platform workflow
With the specs decided and the master prompt locked, generating the actual kit becomes mechanical — which is exactly the point. Here's the order of operations that produces a complete, coherent set in one sitting. We'll build it in Oxava, where your references, prompt, and generation all live in one studio, so the brand recipe is right there as you create instead of in a doc someone forgot to open.
Step 1 — Set your master scene. Start with one strong base image that captures the look: your subject, your master prompt, your reference image attached as a style anchor. Generate a handful of options and pick the one that most feels like your brand. This is your anchor — every other format flows from it.
Step 2 — Build the feed grid. With the look locked, generate your feed posts at your chosen ratio (1:1 or 4:5). For a planned nine-square grid, keep the variable half varying in a deliberate rhythm — a product shot, then a texture/detail, then a lifestyle scene, repeating — so the grid has visual variety within a single coherent style. Because you're holding the fixed block steady, all nine come out as a family.
Step 3 — Spin up the story set. Switch the aspect ratio to 9:16 and regenerate the same scenes, this time guiding composition for the vertical safe zone — "keep the product in the central band, clean space top and bottom for text and stickers." A modern studio recomposes the scene to fit the new ratio rather than just cropping it, so the story looks intentional, not like a squished feed post. Generate three to five story frames so you have a small series, not a single slide.
Step 4 — Make the profile photo and covers. For the avatar, generate a 1:1 with your subject (or a clean brand mark / icon-style composition) dead-center with generous margin, so it survives the circular crop and the tiny display size. For banners, switch to 16:9 (and your platform's wide ratio), and generate with the subject offset and a large clean area where the headline will go.
Step 5 — Lock style across the whole kit with i2i. This is the secret to a kit that truly matches. Instead of relying on words alone, use image-to-image (i2i): feed your locked master scene back in as a reference and generate the other formats from it, so each new shape carries the actual lighting, palette, and feel of the original rather than re-rolling them from scratch. The deeper mechanics of this — holding a subject steady while changing the scene, swapping backgrounds, recoloring — are covered in the AI image-to-image editing workflow guide.
That's a complete kit — feed grid, story set, profile photo, and banners — all sharing one DNA, produced in a single session. Want to try it yourself? Open the Oxava studio, upload your reference image, paste your master prompt, and generate your first format. Then switch the aspect ratio and watch the same look carry across feed, story, and banner — references, prompt, and generation in one place, which is what keeps the whole kit coherent instead of each format drifting on its own.
One important boundary: leave the text off the image. AI image models still render words unreliably, and baked-in text can't be edited or localized. Generate the visual with deliberate empty space where the headline goes, then add the actual copy and your logo as a separate layer in any basic layout tool afterward. Crisp, editable, on-brand.
Keeping it consistent at scale: prompt templates and batch strategy
Building one kit is a milestone. The real win is keeping every future kit consistent without rebuilding the system each month — turning your visual DNA into a machine that keeps producing on-brand work as your calendar churns. Three habits make that happen.
Template your prompts, vary one variable. Your master prompt's fixed half never changes. To produce a month of posts, you simply maintain a short menu of variable halves — "product on stone surface," "held in hand," "flat-lay on linen," "lifestyle counter scene" — and combine each with the fixed block. Generating thirty posts becomes swapping thirty subject phrases against one frozen brand block, not writing thirty prompts from scratch. Keep that menu in a note alongside the fixed block so anyone on your team pulls from the same source.
Batch by format, not by post. Rather than finishing one post fully (square, story, banner) before starting the next, generate all your squares in one pass, then all your stories, then all your banners. Working in format-batches keeps your settings and composition rules consistent across each set and is dramatically faster than constantly switching context. It also makes the grid easier to plan as a whole.
Run a thirty-second review on every output. Even a good system produces the occasional off-brand result, so guard the output. Before anything ships, check it against three things: does the palette sit inside your brand range (compare to your color reference, not from memory)? Is the lighting the same direction and softness as the rest of the kit? And the decisive test — place the new image next to two existing on-brand posts: if it looks like a sibling, it passes; if it looks like a cousin from another family, it goes back to the template. When something fails, fix the recipe (an unspecified variable, the wrong reference, a loose seed) rather than hand-patching the one image — fixing the recipe prevents the next ten failures.
This is also where it's worth drawing a line between organic social visuals and paid ad creatives. They share this exact system — base image, brand block, format variations — but ads add their own layer: a test matrix of variations, performance feedback, and scaling the winners. If your kit is heading toward paid campaigns, the companion guide on creating AI ad creatives without a designer picks up exactly where this one leaves off, covering the test-and-scale loop that organic posting doesn't need.
Done right, the system compounds. Each month's best posts become new reference images, the fixed block gets a little sharper, and your feed gets tighter over time instead of drifting. That's the difference between using AI to make pictures and using it to run a brand.
Frequently Asked Questions
I don't have professional photos. Can I still build a kit?
Yes — and this is exactly where AI shines. You don't need a studio or a photographer. A clear phone photo in decent daylight is enough of a starting point, because the model transforms it: cleans the background, places it into a generated scene, and applies your brand look. You can also generate scenes entirely from a text prompt plus a style reference, no source photo required. The one thing AI can't do is invent your taste — you still decide what looks on-brand — but it absolutely removes the "I have no good photos" barrier.
Why do my visuals look different from platform to platform?
Almost always because each platform uses a different aspect ratio, and you're cropping one image to fit rather than composing for each shape. A square feed post crammed into a 9:16 story loses its edges and its balance. The fix is to generate each format at its native ratio from the same locked look — let the model recompose the scene for the new shape instead of squishing one image into all of them. Holding your master prompt (and ideally a reference image) constant across those native-ratio generations is what keeps them looking like one brand in every shape.
How long does it take to produce twenty visuals a week?
Once your visual DNA and master prompt are set up — a one-time half-hour — a weekly batch of twenty is realistically an afternoon, often less. The reason is leverage: the slow part (deciding the look, building the prompt, choosing references) is done once, so each new visual is mostly swapping a subject phrase and a ratio, then a quick review. The first kit takes the longest because you're building the system; every kit after that rides on it.
How many reference images do I actually need?
Aim for 8 to 15, not a hundred. The goal is a tight, opinionated definition of your look — a few hero examples, a couple of color references, a couple of lighting references. Too few and the style is ambiguous; too many and it becomes contradictory and the model gets confused signals. Curate hard, write down why each image is on-brand, and you'll have a reference set that anchors everything you generate.
Should I put text directly on AI-generated visuals?
No — keep text as a separate layer added after generation. AI image models still produce unreliable, often garbled lettering, and any text baked into the image can't be edited or localized later. Generate the visual with intentional empty space where the headline, handle, or logo should sit, then add the real copy on top with any basic layout tool. This keeps your words crisp and your visuals reusable.
Start creating your social media visual kit today
A consistent social presence doesn't come from posting more or hiring out — it comes from building a small, repeatable system once and applying it everywhere. Decide your four core formats and their specs, define your visual DNA in colors and mood, freeze it into a master prompt, generate the full kit format by format, and keep it coherent with templates, format-batching, and a quick review. That's a feed grid, a story set, a profile photo, and banners that all unmistakably belong to the same brand — produced in an afternoon instead of farmed out for a fee.
The fastest way to feel the difference is to build one kit start to finish. Take your best image into the Oxava studio, write your master prompt with your brand colors and mood, attach a reference, and generate a 1:1 feed post. Then switch to 9:16 for a story and 16:9 for a banner, holding the look steady, and watch a coherent set come together in minutes. Once you see a batch come out looking like siblings instead of strangers, the Monday-morning panic disappears for good. To go deeper on the two halves that matter most, pair this with the brand consistency guide for a look that compounds, and the prompt-writing guide for scenes that land on the first try.
Oxava Team
From the Oxava content team. Writing about the creative side of generating images and video with AI.
Related Articles
ALL POSTS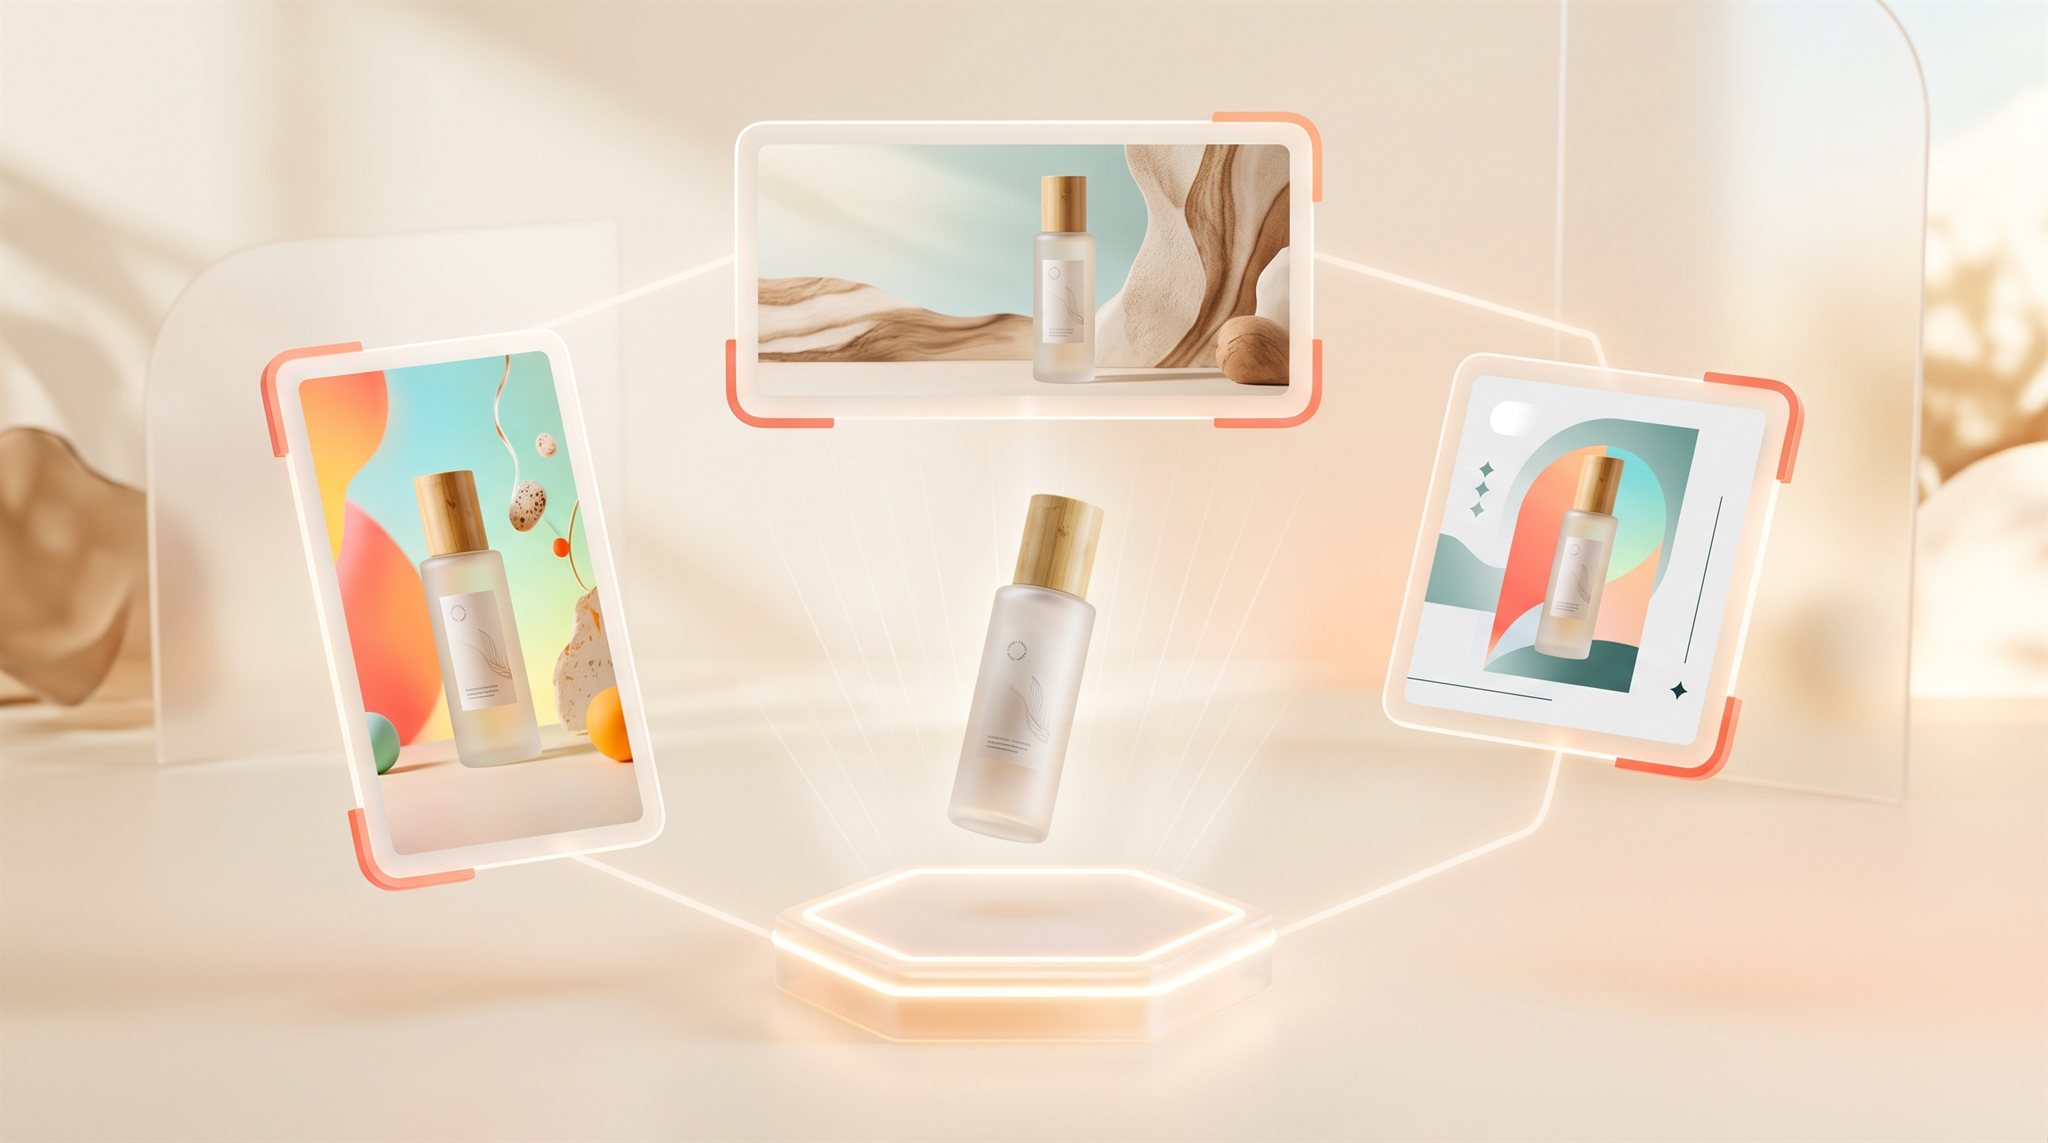
Subscribe to our newsletter
Be the first to hear about new techniques, model updates and ideas on AI generation.